
Because the article I'm going to write will be a continuation of a topic from my book, "WebAssembly in Action", I thought it would be best to continue to use Python as the local web server.
As it turns out, running Python's web server from the command line doesn't give an option to include response headers. Fortunately, it's not hard to extend the web server which you'll learn how to do in this article.
As a bonus, there's another advantage to extending Python's local web server. WebAssembly files (.wasm) need to be served with the 'application/wasm' Media Type but Python didn't have that value specified in versions older than 3.7.5. By extending the web server, you can include the Media Type without needing to modify any of Python's files which simplifies getting up and running with WebAssembly.
The Python code that you'll need to write is slightly different between the 2.x and 3.x versions of Python so the first thing you need to do is determine which version you have on your machine.
Python's version
To check which version of Python you have installed, open a console window and run the following command:
python --version
You should see the version displayed similar to the following image:

(click to view the image full size)
If you have Python 3.x installed, skip the following section and go to the "Extending Python 3's web server" section.
Extending Python 2's web server
The first thing that you need to do is create a file for the python code and name it wasm-server.py
Open the file in the IDE of your choice and then add the following import statements:
import SimpleHTTPServer
import SocketServer
import SocketServer
Next, define a subclass of the SimpleHTTPServer.SimpleHTTPRequestHandler and override the end_handlers method. We won't return any additional headers in this article but this method allows you to return additional response headers like CORS (Cross-Origin Resource Sharing) for example. End the method by calling the base class so that it will run its code too. Add the following code to your wasm-server.py file after the import statements:
class WasmHandler(SimpleHTTPServer.SimpleHTTPRequestHandler):
def end_headers(self):
# Include additional response headers here. CORS for example:
#self.send_header('Access-Control-Allow-Origin', '*')
SimpleHTTPServer.SimpleHTTPRequestHandler.end_headers(self)
#self.send_header('Access-Control-Allow-Origin', '*')
SimpleHTTPServer.SimpleHTTPRequestHandler.end_headers(self)
Insert a couple of line feeds after the end_headers method and then add the following Media Type for WebAssembly files:
WasmHandler.extensions_map['.wasm'] = 'application/wasm'
You're now going to add some code that will start up the web server. Python files can be loaded by other files (modules) or run directly. You'll be running it directly but, if it were to be loaded by another module, you wouldn't want to start up the web server in that case because the calling module will likely handle that. To check if the module is being run directly, you check the __name__ variable to see if it holds the string "__main__" which is set by the Python interpreter when run directly.
Following the WasmHandler.extensions_map line of code, add a couple of line feeds and then the following code to start up the web server when the module is run directly:
if __name__ == '__main__':
PORT = 8080
httpd = SocketServer.TCPServer(("", PORT), WasmHandler)
print("Listening on port {}. Press Ctrl+C to stop.".format(PORT))
httpd.serve_forever()
httpd = SocketServer.TCPServer(("", PORT), WasmHandler)
print("Listening on port {}. Press Ctrl+C to stop.".format(PORT))
httpd.serve_forever()
Save the wasm-server.py file.
The following section will show the steps needed to extend Python's web server if you're using version 3.x. Skip the following section if you completed the previous section "Extending Python 2's web server".
Extending Python 3's web server
The first thing that you need to do is create a file for the python code and name it wasm-server.py
Open the file in the IDE of your choice and then add the following import statements:
import sys
import socketserver
from http.server import SimpleHTTPRequestHandler
import socketserver
from http.server import SimpleHTTPRequestHandler
Next, define a subclass of the SimpleHTTPRequestHandler and override the end_handlers method. We won't return any additional headers in this article but this method allows you to return additional response headers like CORS (Cross-Origin Resource Sharing) for example. End the method by calling the base class so that it will run its code too. Add the following code to your wasm-server.py file after the import statements:
class WasmHandler(SimpleHTTPRequestHandler):
def end_headers(self):
# Include additional response headers here. CORS for example:
#self.send_header('Access-Control-Allow-Origin', '*')
SimpleHTTPRequestHandler.end_headers(self)
#self.send_header('Access-Control-Allow-Origin', '*')
SimpleHTTPRequestHandler.end_headers(self)
In Python 3.7.5, the WebAssembly Media Type was added but it didn't exist before that version. Insert a couple of line feeds after the end_headers method and then add the following code that checks to see if the version of Python is less than 3.7.5. If so, include the Media Type for WebAssembly files:
if sys.version_info < (3, 7, 5):
WasmHandler.extensions_map['.wasm'] = 'application/wasm'
You're now going to add some code that will start up the web server. Python files can be loaded by other files (modules) or run directly. You'll be running it directly but, if it were to be loaded by another module, you wouldn't want to start up the web server in that case because the calling module will likely handle that. To check if the module is being run directly, you check the __name__ variable to see if it holds the string "__main__" which is set by the Python interpreter when run directly.
Following the WasmHandler.extensions_map line of code, add a couple of line feeds and then the following code to start up the web server when the module is run directly:
if __name__ == '__main__':
PORT = 8080
with socketserver.TCPServer(("", PORT), WasmHandler) as httpd:
with socketserver.TCPServer(("", PORT), WasmHandler) as httpd:
print("Listening on port {}. Press Ctrl+C to stop.".format(PORT))
httpd.serve_forever()
httpd.serve_forever()
Save the wasm-server.py file.
Now that you have your wasm-server.py file created, it's time to test it.
Running the extended web server
You can test your extended web server by opening a console window and executing the following command:
python wasm-server.py
You should see output similar to the following displayed:

(click to view the image full size)
If you place an HTML file in that folder called test.html, for example, you could open your browser, type the following into the address bar and Python's simple HTTP server will serve it:
http://localhost:8080/test.html
Summary
In this article you learned how to extend Python's Simple HTTP Server so that you can return additional response headers if need be.
You also learned how to include the WebAssembly Media Type, application/wasm, if the version of Python in use is doesn't include it.
As of version 3.7.5, Python includes the necessary WebAssembly Media Type.
Source Code
The source code for this article can be found in the following github repository: https://github.com/cggallant/blog_post_code/tree/master/2020%20-%20July%20-%20Extending%20Python%E2%80%99s%20Simple%20HTTP%20Server
The source code for this article can be found in the following github repository: https://github.com/cggallant/blog_post_code/tree/master/2020%20-%20July%20-%20Extending%20Python%E2%80%99s%20Simple%20HTTP%20Server
Additional Material on WebAssembly
Like what you read and are interested in learning more about WebAssembly?
Like what you read and are interested in learning more about WebAssembly?
- Check out my book "WebAssembly in Action"
 The book introduces the WebAssembly stack and walks you through the process of writing and running browser-based applications. It also covers dynamic linking multiple modules at runtime, using web workers to prefetch a module, threading, using WebAssembly modules in Node.js, working with the WebAssembly text format, debugging, and more.
The first chapter is free to read and, if you'd like to buy the book, it's 40% off with the following code: ggallantbl
- Blazor WebAssembly and the Dovico Time Entry Status app
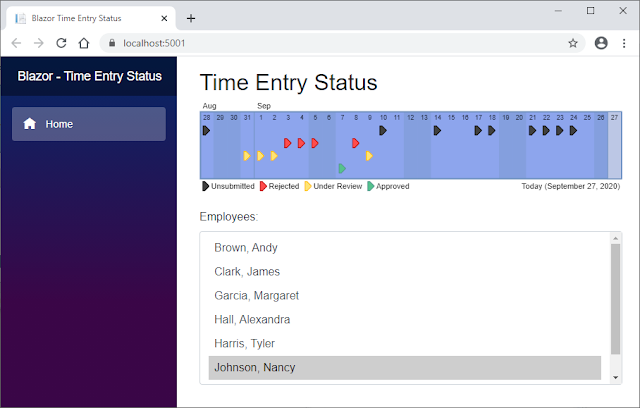 As I was digging into WebAssembly from a C# perspective for an article that I was preparing to write, I decided to use some research time that my company gave me to dig into Blazor WebAssembly by rewriting a small Java application that I built in 2011.
This article walks you through creating the Dovico Time Entry Status app using Blazor WebAssembly.
- Using WebAssembly modules in C#
 While there were a lot of exciting things being worked on with the WebAssembly System Interface (WASI) at the time of my book's writing, unfortunately, it wasn't until after the book went to production that an early preview of the Wasmtime runtime was announced for .NET Core.
I wrote this article to show you how your C# code can load and use a WebAssembly module via the Wasmtime runtime for .NET. The article also covers how to create custom model validation with ASP.NET Core MVC.
- WebAssembly threads in Firefox
 My book shows you how to use WebAssembly threads but, at the time of its writing, they were only available in Firefox behind a flag. They're no longer behind a flag but Firefox has added a requirement: To enable the SharedArrayBuffer, you need to include two response headers.
Although the headers are only required by Firefox desktop at the time of this article's writing, this will soon change as Chrome for Android will require the headers when version 88 is released in January 2021. Chrome desktop is expected to require the headers by March 2021.
This article walks you through returning the response headers and using WebAssembly threads to convert a user-supplied image to greyscale.
- Using the import statement with an Emscripten-generated WebAssembly module in Vue.js
 Over the 2019 Christmas break, I helped a developer find a way to import an Emscripten-generated WebAssembly module into Vue.js. This article details the solutions found.
Disclaimer: I was not paid to write this article but I am paid royalties on the sale of the book "WebAssembly in Action" which I mentioned in this article.