WebAssembly in Action

Author of the book "WebAssembly in Action"
Save 40% with the code: ggallantbl
The book's original source code can be downloaded from the Manning website and GitHub. The GitHub repository includes an updated-code branch that has been adjusted to work with the latest version of Emscripten (currently version 3.1.44).

Friday, August 27, 2010

Firefox Tab Previews

With the release of Firefox 4 just around the corner I've been playing with the betas to see how well they work with my existing web applications as well as to see what's new under the hood.

As I was digging through the configuration settings of Firefox 4 beta 4 I noticed something...

I was looking forward to a feature that was expected in an earlier version of the browser (I think it was originally intended for Firefox 3.0 but I can't remember for sure now) but the feature ended up getting pushed off for another release and I forgot all about it.

As it turns out, the feature I was waiting for was released in Firefox 3.6!

Yes, that's right, I'm talking about tab previews of your open tabs when you Ctrl + Tab through them!

I'm a geek. I like this sort of thing.

From the looks of it there are some tab preview add-ons available for Firefox so maybe this feature wasn't turned on by default in case users already have an add-on installed. Either way, if you want to use the built-in tab preview in Firefox you have to manually turn it on.

If you want to turn on the tab preview in Firefox 3.6 or higher:
  • Type about:config in your address bar
  • Click the I'll be careful, I promise! button
  • In the Filter text box type in previews

There are two options here that may be of interest to you.

The first option browser.ctrlTab.previews gives you the following when you Ctrl + Tab with 3 or more tabs open:

(click to view the image full size)
  • Double-click on browser.ctrlTab.previews preference to toggle its value to true to enable the tab preview when you Ctrl + Tab.

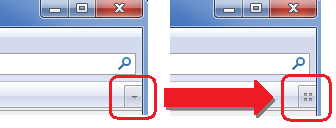
The other option browser.allTabs.previews changes the List all tabs button, that gives you a drop-down list of all open tabs, into a button that will show you all of the open tabs. The following image shows the button that is changed and what it looks like when this option is on:

(click to view the image full size)

The allTabs option basically gives you a way to see all tabs with a click of the mouse rather than having to hold the Ctrl key after having clicked Ctrl + Tab once.

If the allTabs option is off, the button won't be available to click on but you can display the same window by clicking the Show all tabs button that is available when you Ctrl + Tab normally. Or you can just press Ctrl + Shift + Tab to show the all tabs window.

The all tabs window has a filter box that filters the tabs displayed (filters by page title) which is helpful if you have a lot of tabs open and are trying to find a specific tab. On my machine, Ctrl + Tab only shows the 6 most recently used tabs so being able to see all open tabs and filter them to a more usable amount is handy.
  • Double click on the browser.allTabs.previews preference to toggle its value to true if you wish to have the List all tabs button changed to now give the graphical preview of the tabs rather than a drop-down list of open tabs.

Friday, August 20, 2010

Creating JavaScript Namespaces

As with any programming language there are many ways to accomplish a task and JavaScript is no different. What I'm about to show you is one way to create namespaces in JavaScript but other approaches exist too.

Organizing functions and variables into classes helps cut down on spaghetti code and introduce some organization to the JavaScript. Namespaces allow you to take that organization a step further and prevent class naming conflicts with other JavaScript libraries.

You can use JSON to create your namespaces but I tend to avoid JSON when creating classes because it does not allow for private members or methods.

The following is an example of how you would create a global namespace object (RootNamespace), add an object to the root object (ServerSideCalls), and then add an even more specific object to the newly added object (Products):

// Our root namespace so that our code does
// not interfere with other libraries.

// Also, being a global object already
// initialized allows calling code to access
// it
without needing to create an instance
// of a class first.
var RootNamespace = new function(){};


// Create a ServerSideCalls object within our
// RootNamespace object

RootNamespace.ServerSideCalls = new function()
{
// Private function
var GetXmlHttpRequestObject = function()
{

if(window.XMLHttpRequest)
{ return new XMLHttpRequest(); }
else if(window.ActiveXObject)
{ return new ActiveXObject("Microsoft.XMLHTTP");
}

}


// Public function
this.SendHttpRequest = function(sURL, sHTTPMethod, sData)
{

// Call the private function to get our
// XmlHttpRequest object

var xhrXmlHttpRequest = GetXmlHttpRequestObject();

// Send the request and return the response
// to the calling function

xhrXmlHttpRequest.open(sHTTPMethod, sURL, false);
xhrXmlHttpRequest.send(sData);
return xhrXmlHttpRequest.responseText;

}
};


// Go a step further and create a Products
// object within our ServerSideCalls object

RootNamespace.ServerSideCalls.Products = new function()
{
this.GetProductList = function()
{

// Call out to our web site to get the
// list of products

var sResult = RootNamespace.ServerSideCalls.SendHttpRequest("ourwebsite.com/products", "GET", "");

// Parse the return data into an array
var arrResults = [];
//...parse code

// Return the array of products
return arrResults;

}
};


Since we initialized our root namespace object when we created it, any code that needs to make use of the contained functions can do so without needing to worry about creating an instance of an object first as in the following example:

function TestNamespace()
{
// Ask for the array of products from our
// web site

var arrProducts = RootNamespace.ServerSideCalls.Products.GetProductList();

// do something with the returned array
// of products

}


You can always create the child namespaces objects within the parent namespace when you create that object. I don’t tend to take that approach because I usually separate my functionality into separate JavaScript files and add the object to the namespace only for the pages that need it.

In this example, I declared the root namespace object as a global variable. I have seen cases where the objects were simply added to the window object and the window object acted like the root namespace. I'm not sure if there are any issues with that approach so I error on the side of caution just in case adding items to the window object is not permitted by a browser in the future.

Friday, August 13, 2010

JavaScript: Try-Catch-Finally and Throw

I ran into an issue a while ago where, on occasion, the window that opened a pop-up was refreshed while the pop-up window was still open.

When the pop-up window tried to call a function within the opener window a 'Permission denied' exception was thrown because the reference to the opener window was no longer valid.

After a bit of searching for a solution I ran across a feature of JavaScript that I didn’t realize was available. The solution was a try-catch statement.

At the time, I didn't realize that JavaScript supported anything more than a simple try-catch block so I didn't dig any further. It was only recently that I ran across an article that opened my eyes to what was possible in JavaScript when it comes to error handling.


The Try-Catch Statement

If an error can be avoided simply by checking to see if an object is null, for example, before using the object then best practices are to test for the null condition rather than use a try-catch statement.

A try-catch statement is used if you have code that might throw an exception and there is no way to test for the error condition. The statement gives you the opportunity to fail gracefully when unexpected errors happen.


The way a try-catch statement works is that you place the code that might throw an unexpected error within a try block. If an error does occur, execution is transferred from the try block to the matching catch block. The catch block can then display or log the error message.

The following is a simple example of a try-catch statement:
try
{

// Do some work that might produce an
// unexpected error
DoSomeWork();

}
catch (e)
{

// Depending on the error you may want
// to log it or display it to the user.
// In this case, display it to the user.
alert("The following error has occurred: " + e.message);

}

The catch block is optional but I recommend that it should only be omitted if you are nesting try-catch statements and only if there is a catch statement further up in the hierarchy.

If no catch statement exists in the hierarchy of nested try-catch statements, once the optional finally blocks finish executing, the execution is transferred to the page so that the error can be logged and/or displayed to the user by the browser. The JavaScript that would normally happen following the code that triggered the exception, will not happen as a result since the exception was not handled by your code.


The Finally Block

There is an optional 'finally' block that can be included with the try-catch blocks and is always the last block of the try-catch statement.

If included, the finally block's code gets executed regardless of if there was an error nor not.

The following is a simple example of a try-catch statement that includes the finally block:
try
{

// Do some work that might produce an
// unexpected error
DoSomeWork();

}
catch (e)
{

// Depending on the error you may want
// to log it or display it to the user.
// In this case, display it to the user.
alert("Error: " + e.message);

}
finally
{

// release resources that might have
// been allocated before the try block
// began


}


Nesting Try-Catch Statements

You can nest try-catch statements.

If an exception happens within an inner try-catch statement and the try block has no matching catch statement then, after the optional finally block finishes execution, the catch block of the wrapping try-catch statement will be transferred the execution of the code so that it can handle the exception.

Letting the exception bubble up the hierarchy of try-catch statements is up to you and can have its uses. One scenario could be that you just have a try-finally block with no catch so that resources are released and then allow the parent try-catch statement to handle the error logging.


The Error object

The standard error object that is usually passed to the catch statement has the following properties (some browsers have additional properties):
  • name - the class of the Error ('DOMException' or 'Error' for example)
  • message - the error message

Depending on who's throwing the error (the browser, a third party's JavaScript library, or even your own code), the error may or may not be the standard Error object and as a result it may or may not contain the properties mentioned above.


It is good practice to test if the desired property exists before trying to access it.


Handling Multiple Types of Exceptions

As you will see in the upcoming Throw section, a variety of items can be thrown.

Sometimes it's nice to be able to do specific error handling for specific types of errors.

With a single catch block this can be achieved by implementing an if/else-if statement, within the catch block, to test which type of error was received and then process the error accordingly as in the following example:

for (var iCounter = 0; iCounter < 3; iCounter++)
{
// Try/catch here in the loop so that if
// DoWork throws an exception, the loop
// will continue on
try
{

DoWork(iCounter);

}
catch (e)
{

// Test for our own specific error
// conditions
if (e == "ItemNotFoundException") { HandleItemNotFoundException(e); }

else if (e == "InvalidCredentialsException") { HandleInvalidCredentialsException(e); }

else if (e == "InvalidDateException") { HandleInvalidDateException(e); }

// We didn't hit one of our own exception
// conditions above so this one isn't
// ours. Handle the standard error...
else { LogSystemError(e); }

}
}

// Simply a function to throw a different
// exception string for each iCounter value
// passed in (simulate some errors)
function DoWork(iCounter)
{
if (iCounter == 0) { throw "ItemNotFoundException"; }

else if (iCounter == 1) { throw "InvalidCredentialsException"; }

else if (iCounter == 2) { throw "InvalidDateException"; }
}


Note: Firefox is the only major browser that supports multiple catch blocks and, as a result, I recommend against using them simply because multiple catch blocks are not cross-browser compatible.


The Throw Statement

Based on what you've read so far, you now know that there are at least two types of items that can be thrown: an Error object and a string.

So far we've caught Error objects but have only thrown strings. The following is an example of how you throw an Error object from your own code:
throw new Error("custom error message");

You can actually throw any expression including strings, numbers, objects, true, false, and null. Some expressions would be more valuable to an error handler within a catch statement than others.


You need to be careful if not passing an Error object as an exception because throwing a string, number, true, false, or null will pass the value to the catch statement 'as is'. The result is that you could end up with the Error object in some cases and your own values (strings, numbers, etc) in other cases.

If you are throwing error expressions that don't match the Error object's structure, you would want to do some form of type checking (typeof, instanceof) on the error object in your catch statements to handle the error correctly in all cases.


Rethrowing the Exception

There are times where you might want to respond to certain error conditions that are specific to your block of code but if a system error occurs, for example, maybe you just want to just let the exception continue up the chain of try-catch statements.

The following is an example that rethrows an exception:
try
{

DoWork(iCounter);


}

catch (e)
{

// Test for our own specific error
// conditions
if (e == "ItemNotFoundException") { HandleItemNotFoundException(e); }

else if (e == "InvalidCredentialsException") { HandleInvalidCredentialsException(e); }

else if (e == "InvalidDateException") { HandleInvalidDateException(e); }

// We didn't hit one of our own
// exception conditions above so this
// one isn't ours. Let one of the
// parent try-catch blocks handle the
// error
else { throw e; }

}


Custom Exceptions

Being able to throw a custom object can be of use in that you can differentiate your own types of errors (CustomException for example) from system errors (Error object).

Throwing a string would be more useful as a way to output a specific error message rather than doing custom error handling when a certain type of error occurs.

The following is an example of the creation and throwing of a custom exception object:

// Our CustomException class declaration
function CustomException(sErrorMessage)
{
this.name = "CustomException";
this.message = sErrorMessage;

this.toString = function () { return this.message; }
}


try
{
...

// We hit an issue. Throw our custom
// exception
throw new CustomException("Processing error...item has already been specified");
}
catch (e)
{
// If the exception is our custom
// exception...
if (e instanceof CustomException)
{

alert("Error: " + e.message);


}

else // Standard Error object
{

// Just rethrow and let the parent
// try/catch statements deal with it
throw e;

}
}


In Closing

When I started looking at this topic as a potential article, I didn't think there would be much to write about. As I started digging deeper, however, I realized that there is much more to the try-catch statement than I originally thought.

I hope this article was of use to you.

Friday, August 6, 2010

A Deeper Look at HTML 5 Web Workers


In this post we will have a deeper look at some of the aspects of HTML 5 Web Workers than we did in my previous article 'An Introduction to HTML 5 Web Workers'.

If you are new to HTML 5 Web Workers then I recommend that you read my previous post which details the different types of web workers that are available, how to create the worker objects and how to communicate between the worker and its creator.


Multiple Shared Workers

When you have a web site (or web application) with multiple windows each needing access to a worker thread you don't really want to create a new thread in each window because it takes time and system resources to create each worker thread.

The ability to share a single worker thread among each window from the same origin comes as a great benefit in this case.

The following is the simplest way to create a SharedWorker thread that multiple windows from the same origin can make use of:

// Window 1
var aSharedWorker = new SharedWorker("SharedWorker.js");

// Window 2
var aSharedWorker = new SharedWorker("SharedWorker.js");

The SharedWorker object accepts an optional 2nd parameter in the constructor that serves as the name of the worker.

When you don't specify the 2nd parameter, it's pretty much the same as specifying a name that is exactly the same each time. With that in mind, the above example can be rewritten as follows and will do the exact same thing:

// Window 1
var aSharedWorker = new SharedWorker("SharedWorker.js", "SharedWorkerName");

// Window 2
var aSharedWorker = new SharedWorker("SharedWorker.js", "SharedWorkerName");

Most of the time having one shared worker will give the needed functionality. If you simply have a desire to add more parallel processing, the shared worker can always spawn web workers of its own (dedicated web workers can also spawn additional worker threads if need be).

What if you run into a scenario where you have a need for several windows to share several workers rather than just the one?

That's where the 2nd parameter of the SharedWorker constructor comes into play.

You can create several different SharedWorker threads by specifying different names when creating the worker objects.

The following is an example of two windows each sharing two worker threads 'Worker1' and 'Worker2':

// Window 1 - Shared Worker 1 & 2
var aSharedWorker1 = new SharedWorker("SharedWorker.js", "Worker1");
var aSharedWorker2 = new SharedWorker("SharedWorker.js", "Worker2");

// Window 2 - Shared Worker 1 & 2
var aSharedWorker1 = new SharedWorker("SharedWorker.js", "Worker1");
var aSharedWorker2 = new SharedWorker("SharedWorker.js", "Worker2");

When it comes to giving shared workers a name it's important to be aware that the names are case sensitive.

If you give one worker the name Worker1 and the other worker the name worker1 they may look the same but the case difference with the 'w' causes there to be two worker threads created rather than simply creating and reusing a single worker thread.


Scope of Shared Workers

Something that you may be curious about is what happens when the window that created a shared worker is closed? Is the worker thread still accessible by other windows from the same origin?

A shared worker will remain active as long as one window has a connection to it. For example:

Window 1 creates a shared worker and Window 2 connects to it.

Later Window 1 is closed but, because Window 2 is still connected, the shared worker thread remains even though Window 2 didn't originally create it.


Importing JavaScript into a Worker Thread

Most modern web development now includes several JavaScript files and, in a lot of cases, JavaScript libraries/frameworks.

Fortunately, worker threads have access to a global function called 'importScripts' which allows you to pull the necessary JavaScript files into the worker thread's scope.

The importScripts function allows you to specify one or more JavaScript files to be imported.

If multiple files are specified, they are downloaded in parallel but will be loaded and processed synchronously in the order specified.

Also, the importScripts function does not return until the JavaScript files specified have been loaded and processed.

The following are some examples of how the importScripts function can be used:

// Import just one file
importScripts("file.js");

// Import multiple files with one call (careful of their order if they have
// global variables that depend on other js files being included in the
// request...the JS files will be downloaded in parallel but loaded and
// processed synchronously based on their order here).
//
// Note: I stopped at 3 files to import but you can include any amount

importScripts("file1.js", "file2.js", "file3.js");

Technically, the W3C specification allows for the importScripts function to be used with no parameters but doing so has no effect.


Attaching to 'onmessage' Within a Shared Worker

In my previous post, I had shown the following method of attaching to a shared worker's onmessage event (within the thread):

onconnect = function (evt) {
var port = evt.ports[0];
port.onmessage = function (e) { OnControllerMessage(e, port); }
}

function OnControllerMessage(e, port) {
var sReturnMessage = ("Hello from the sharedworker thread!...This is what you sent my way: " + e.data);

port.postMessage(sReturnMessage);
}

Unfortunately, the above example was accomplished by creating a closure and I'm not a fan of using closures.

I did some digging and found a workaround that avoids the needed for a closures by using the target property of the event object. The target property, in this case, is the port.

The following example demonstrates connecting to the onmessage event and posting data back to the caller via the event's target property:

onconnect = function (evt) {
evt.ports[0].onmessage = OnControllerMessage;
}

function OnControllerMessage(e) {
var sReturnMessage = ("Hello from the sharedworker thread!...This is what you sent my way: " + e.data);

e.target.postMessage(sReturnMessage);
}


Timeouts

Worker threads support timeouts (setTimeout, clearTimeout, setInterval, and clearInterval) which is useful if you only want to process information at set intervals rather than be constantly processing.

One scenario that comes to mind could be if you had a need to check for updates from a 3rd party site and didn't want to constantly hammer the site with requests.

You could set up a timer to check the site every five minutes or so and if new information is available then pass it up to the UI layer so that it can be included in the display information.


The XMLHttpRequest Object

The XMLHttpRequest object can be used in a worker thread and can be used synchronously or asynchronously. It's totally up to you if you use it asynchronously since a worker thread is already separate from the UI thread so waiting for a synchronous return won't hurt the UI's responsiveness.

Something to be aware of about using the XMLHttpRequest object, from within a worker thread, is that the 'responseXML' property will always be null.

The Gecko-specific 'channel' attribute in the XMLHttpRequest instance will also be null when the XMLHttpRequest object is used within a worker thread.

The return data from an XMLHttpRequest, when within a worker thread, will always be in the 'responseText' property as shown in the following example:

var xhrRequest = new XMLHttpRequest();
xhrRequest.open("GET", sURL, false);
xhrRequest.send();

return xhrRequest.responseText;


Error Handling

Unhandled exceptions can be caught within the worker thread by attaching a function to the global 'onerror' event.

There are some browser differences to note here:
  • Chrome 5 and Safari 5 both just pass the error as a string to the error handler in the thread
  • Firefox 3.6.8 and 4.0 beta 2 pass in an ErrorEvent object to the error handler in the thread


The ErrorEvent object's attributes are:
  • message - A human-readable error message
  • filename - The name of the script file in which the error occurred
  • lineno - The line number of the script file on which the error occurred


The following is an example of attaching to the onerror event of a dedicated worker thread (the example will also work for shared workers with the exception that with shared workers postMessage needs to be called on a port):

// Attach to the global error handler of the thread
onerror = OnErrorHandler;

function OnErrorHandler(e) {
// In Chrome 5/Safari 5, 'e' is a string for both dedicated and shared
// workers within the thread

if (typeof (e) == "string"){
postMessage("Error Message: " + e);
} else { // Dedicated worker in Firefox...(Firefox does not yet support
// shared workers)
postMessage("Error Message: " + e.message + " File Name: " + e.filename + " Line Number: " + e.lineno);
}
}

// to test the error handler, throw an error
throw "This is a test error";

You can also attach to an error event of the worker object instance itself so that the creating thread can also have access to the error information.

All browsers (Chrome 5, Safari 5, Firefox 3.6.8 / 4.0 beta 2) implement the dedicated worker instance error event in the same way by passing in the ErrorEvent object.

When it comes to shared workers, however, I have not been able to get the shared worker object instance to trigger the onerror event in Chrome 5 or Safari 5. From my research, it appears that for shared workers the onerror event will only be triggered for the shared worker instance if there was a network error while the worker thread was being created.


The following is an example of attaching to the onerror event of a dedicated worker instance (you set up a shared worker the exact same way):

var aWorker = new Worker("DedicatedWorker.js");
aWorker.onerror = OnErrorMsg;

function OnErrorMsg(e) {
alert("Error Message: " + e.message + " File Name: " + e.filename + " Line Number: " + e.lineno);
}


Closing a Worker Thread

The creator of a worker can close the thread by calling 'terminate' on the worker instance as in the following example:

var aDedicatedWorker = new Worker("DedicatedWorker.js");

...

// We're done with the tread so let the browser release the system
// resources

aDedicatedWorker.terminate();

An alternative to using the terminate method on the worker instance is that the thread has the ability to close itself as in the following example:

// JavaScript of the thread itself

...

close();


In Closing

Between my previous post 'An Introduction to HTML 5 Web Workers' and this one, I hope I have been able to help you in your understanding of web workers so that you can make use of all the possibilities this exciting new technology brings to web development!

If you would like more information on the HTML 5 Web Workers specification you can click on the following links:


New: I have recently written an article for DZone.com which combines the Web Worker information presented in my blog posts and introduces some new information like transferable objects, inline workers, and includes a link to a sample project stored on github.com. The article can be found here: http://refcardz.dzone.com/refcardz/html5-web-workers

Monday, August 2, 2010

An Introduction to HTML 5 Web Workers


Prior to HTML 5 Web Workers, all JavaScript code would run in the same thread as the UI of that browser window. The result was that all long-running scripts would cause the browser window to freeze until processing finished. If the script took long enough, the browser would prompt the user to see if he/she wanted to stop the unresponsive script.

Web workers allow for script to run in a separate thread from the browser window's UI. This allows long-running scripts to take place without interfering with the browser's user interface (the window stays responsive to input, like clicks and scrolling, even while processing).

As a result of running in a separate thread from the browser's UI the worker thread does not have direct access to the DOM or other UI objects.

If the worker thread needs the UI updated based on processing, the JavaScript that created the worker thread can set up a callback function to listen for messages from the worker. The main UI thread could then respond to the messages from the worker and do the proper UI modification.

One thing to be aware of with web workers is that they are not intended to be used in large numbers and are expected to be long-lived. The worker threads also have a high start-up performance cost as well as a high memory cost per worker instance.


Types of Web Workers

There are two types of web workers available: Dedicated Workers and Shared Workers.

Dedicated workers are linked to their creator. They are also a bit simpler to create and work with than shared workers.

Shared workers allow any script from the same origin/domain to obtain a reference to the worker and communicate with it.


Browser Support

Dedicated Web Workers are supported in Firefox 3.5+, Chrome 5+, and Safari 5+ (I've read that dedicated web workers are supported in Chrome 4 and Safari 4 as well but I haven't tested those browsers to know for sure).

Shared Web Workers are supported in Chrome 5.0+ and Safari 5.0+. I haven't tested Shared Web Worker support in Chrome 4 or Safari 4 so I don't know if those browsers support it or not.

Firefox does not appear to support Shared Web Workers (tested in 3.6.8 as well as 4.0 beta 2).

Internet Explorer does not yet support either type of web worker (tested in IE 8 as well as IE 9 Preview 3).


Test for Browser Features

Because web workers are a relatively new technology, not all browsers will support them. Even in a browser that supports one type of web worker, it might not support the other type (Firefox, for example, currently only supports dedicated web workers).

It is always best to test if a browser supports a particular feature before trying to use it.

The following is an example of how you would test if a browser supports Dedicated Web Workers or Shared Web Workers:

// Test if Dedicated Web Workers are available
if (window.Worker) { g_bDedicatedWorkersEnabled = true; }

// Test if Shared Web Workers are available
if (window.SharedWorker) { g_bSharedWorkersEnabled = true; }


Dedicated Web Workers

To create a dedicated web worker, you simply create a new instance of the Worker object passing in a string that specifies the location of the JavaScript file for the worker code. The following is an example of creating a dedicated worker instance:

var aWorker = new Worker("DedicatedWebWorker.js");

The worker object was designed to accept a string (location of the JavaScript file) rather than a function in order to prevent a developer from creating a closure that would allow the worker thread to gain direct access to the browser's DOM or other page elements.

Communication between the creator of the worker thread and the worker thread itself is achieved by means of postMessage calls. To pass a message to the worker thread you would do the following:

aWorker.postMessage("Hello from the main page");

In order for the creator of the worker thread to receive messages from the worker thread, you will need to set up a function to receive the 'onmessage' event. The following is an example of how you would attach a function to the onmessage event:

aWorker.onmessage = OnWorkerMessage;

function OnWorkerMessage(evt) {
alert("Worker's message: " + evt.data);
}

Within the JavaScript file of the worker thread (DedicatedWebWorker.js in our case) you would attach a function to the 'onmessage' event to receive messages from the thread that created the worker.

The following is an example of a worker thread attached to the onmessage event:

onmessage = OnCreatorMessage;

function OnCreatorMessage(evt) {
var sReturnMessage = ("Hello from the worker thread! This is what you sent my way: " + evt.data);

// Pass our message back to the creator's thread
postMessage(sReturnMessage);
}


Shared Web Workers

Shared web workers provide a way for any window, from the same origin/domain (SomeWebSite.com for example), to share the use of a worker thread.

Since worker threads take time to start initially and use a lot of memory per worker, being able to share the worker rather than creating one for each open window can improve performance. The trade off, however, is that the shared worker objects are a bit more involved to set up than dedicated workers are.

To create a shared web worker, you create an instance of the SharedWorker object and pass in a string indicating the location of the JavaScript file for the worker thread. The following is an example of creating a SharedWorker instance:

var aSharedWorker = new SharedWorker("SharedWorker.js");

To receive messages from the shared worker thread you attach to the 'onmessage' event but in a slightly different way compared to that of a dedicated web worker. In this case, you need to access the 'port' object of the shared worker instance and then attach to the port object's onmessage event as in the following example:

aSharedWorker.port.onmessage = OnWorkerMessage;

Rather than using the above method to attach to the onmessage event, you can also use the addEventListener function as in the following example:

// uses 'message' (not 'onmessage' as in previous examples) aSharedWorker.port.addEventListener("message", OnWorkerMessage, false);

// Required when using addEventListener
aSharedWorker.port.start();

The OnWorkerMessage function itself is shown below (no difference compared to how it worked with dedicated web workers):

function OnWorkerMessage(evt) {
alert("Worker's message: " + evt.data);
}

For each additional window that wants to connect with the shared worker, you simply repeat the above steps in each window.


Communication with the shared worker thread is achieved by means of postMessage calls on the port object. To pass a message to the shared worker thread you would do the following:

aSharedWorker.port.postMessage("Hello from Page 1");


Within the JavaScript file of the shared worker thread (in our case SharedWorker.js) you first attach to the 'onconnect' event which is called whenever a new object obtains a reference to the shared worker thread.

When the onconnect event fires you then attach to the onmessage event of the port passed in so that you can send/receive messages with the newly connected object.

// event triggered whenever an object attaches to this shared worker
onconnect = function(evt) {
// Get the port of the newly attached object. Attach to the onmessage
// event so that we can send/receive messages with the newly
// attached object

var port = evt.ports[0];
port.onmessage = function(e) { OnCallerMessage(e, port); }
}

function OnCallerMessage(evt, port) {
var sReturnMessage = ("Hello from the SharedWorker thread! This is what you sent my way: " + evt.data);

port.postMessage(sReturnMessage);
}


In Closing

I hope you found this post useful in understanding the basics of HTML 5 Web Workers.

For more detailed information the the HTML 5 Web Workers specification you can view it by clicking on the following link: http://dev.w3.org/html5/workers/


Update: If you are interested, I have now posted a follow-up to this article called 'A Deeper Look at HTML 5 Web Workers' which examines things like multiple shared workers, importing JavaScript files, and using the XMLHttpRequest object from within a worker thread.

New: I have recently written an article for DZone.com which combines the Web Worker information presented in my blog posts and introduces some new information like transferable objects, inline workers, and includes a link to a sample project stored on github.com. The article can be found here: http://refcardz.dzone.com/refcardz/html5-web-workers