

This article covers
Recently, a customer contacted the company I work for looking for the Time Entry Status app that we used to offer on our website. It was a small Java app that I wrote in 2011 to accompany Dovico's new Timesheet API that I was creating at the time.
As shown in the following screen shot, the app gives you a bird's eye view of the selected employee's time over the past 30 days. Red indicates there's rejected time, black is time that hasn't been submitted, yellow is time that's awaiting approval, and blue is time that has been approved. If there's no triangle then there's no time entered for that day.

(click to view the image full size)
The app is very useful if you want to quickly verify that your employees submitted their time before you run your reports or generate your invoices. It's also helpful for employees who want to quickly check to make sure that all of their time is in and has been submitted.
Over the past few weeks, I've been digging into WebAssembly from a C# perspective for an article that I'm writing. Although I've been following a number of WebAssembly related C# technologies like mono, the Uno Platform, and Blazor, I felt that I'd get more out of my learning by building something.
Fortunately, Dovico recently gave me some spare time to research into anything that interested me, so I decided to use that time to dig into Blazor by rewriting this application. In the process, a few adjustments were made to the timeline to modernize its look a bit as shown in the following image.
(click to view the image full size)
This article will walk you through the steps to re-create the Time Entry Status app using Blazor WebAssembly.
The Time Entry Status view will consist of two main elements as shown in the following image. The timeline will be drawn using an HTML Canvas element via the Blazor.Extensions.Canvas nuget package. The list of employees will use an HTML Select element.

(click to view the image full size)
As shown below, the following are the steps for building this application:

(click to view the image full size)
As the following image shows, your first step is to create a Blazor WebAssembly project.

This article will be using Visual Studio 2019 to build the application, but Visual Studio Code can also be used. If you’d prefer to use Visual Studio Code, the following web page walks you through the steps to create a Blazor WebAssembly project using that IDE: https://docs.microsoft.com/en-us/learn/modules/build-blazor-webassembly-visual-studio-code/
Open Visual Studio 2019 and choose Create a new project
The application you're about to build will be pulling its information from a Dovico Timesheet demo database via the Dovico Timesheet API. Signing up for a demo database is free and is good for 30 days. To sign up, click the Try for free button at the top of the Dovico website: https://www.dovico.com/
The Dovico Timesheet API expects every call to include an Authorization header in the following format:
The Consumer secret and Data access token values can be found in the Company view (Setup menu) of Dovico Timesheet in the API tab.
The Dovico Timesheet API was designed when a lot of applications were still using XML and, as a result, the data is returned in XML format by default. To change the response to JSON, you'll need to include an Accept header with the value application/json. For more information about the Dovico Timesheet API, the documentation can be found at the following website: https://www.dovico.com/developer/API_doc/
Rather than have your code specify the Authorization and Accept headers every time you send a request to the API, you'll modify the HttpClient object in the Program.cs file, to specify the headers in the DefaultRequestHeaders property. Once set, every HTTP request your application makes will include the request headers automatically.
Open the Program.cs file and adjust the Main function to now have the code shown in the following code snippet. Note that the AccessToken string shown in the following snippet will need to be adjusted to match the values from your demo database as the ones shown here might be expired depending on when you read this article.
You will also need to include the following using statement at the beginning of the Program.cs file:
With the project created and the default HTTP request headers specified, your next step as shown in the following image, is to install and configure the Blazor.Extensions.Canvas nuget package. This package will make interacting with an HTML Canvas element easier from C#.

The timeline portion of the view, as shown in the following image, will be drawn using an HTML canvas element and will be adjusted from C# by using the Blazor.Extensions.Canvas nuget package. More information about this package can be found by visiting the following web page: https://www.nuget.org/packages/Blazor.Extensions.Canvas/1.0.0

To install the package, click on the Tools, NuGet Package Manager, Package Manager Console menu item and then run the following command:
Open your _Imports.razor file and add the following using statement after the other using statements:
In your Solution Explorer, expand the wwwroot folder, and then open the index.html file. Add the following script tag just before the </head> tag:
With the Blazor.Extensions.Canvas nuget package installed and configured your next step, as shown in the following image, is to define the models for Dovico Timesheet's data.

When the view is first displayed, it will call the Dovico Timesheet API for the list of employees. If you use an individual employee's data access token for the call, the employee might not have permission to the Employees endpoint. If the request for employees fails with an Unauthorized status code, the view will then call the Employees/Me endpoint for the logged in employee's basic information.
The response data returned from both endpoints will be similar, but the Employees/Me response data will only hold the employee's ID, first name, and last name. The PrevPageURI, NextPageURI, and WorkDays properties won't be present in the Employees/Me response data.
The WorkDays value is used by the view to give a slightly darker background on the timeline for the days that the employee isn't scheduled to work. The Employee model will set the WorkDays default value to indicate that Saturday and Sunday are non-working days in the event the API call does not return the WorkDays property.
In the Solution Explorer, right-click on your project and choose Add, New Folder from the context menu. Give the folder the name Models.
Right-click on the Models folder and choose Add, Class... from the context menu. Give the class the name Employee.
In your new Employee.cs file, replace the generated Employee class with the code from the following snippet:
The Time Entry Status view will present the employees to the user in an HTML Select element. When the user selects an employee, that employee's time information will be requested from the Dovico Timesheet API to render the timeline.
Your next step is to create the models for the time entry information that you'll need from the API.
The API will return the time entry's date as a string in the format yyyy-MM-dd. To make working with the data easier, your model will convert the string into a DateTime object.
Right-click on your Models folder again and choose Add, Class... from the context menu. Give the class the name TimeEntry.
In your TimeEntry.cs file, replace the generated TimeEntry class with the code from the following snippet:
You need to include the following using statement at the beginning of the TimeEntry.cs file because of the use of the CultureInfo class when parsing the date:
With the models now created, you're ready to build the Time Entry Status view itself which is your next step as shown in the following image.

Rather than creating a new page for the Time Entry Status view, you'll modify the generated Index.razor file.
Blazor uses razor pages which are a combination of razor markup, HTML and C# code. More information about razor pages can be found on the following web page: https://docs.microsoft.com/en-us/aspnet/core/mvc/views/razor?view=aspnetcore-3.1
In the Solution Explorer, expand the Pages folder, and open the Index.razor file. Delete everything from the file after the @Page declaration.
The first thing that you need to add to the page are the using statements for the models that you just built as well as the Blazor.Extensions.Canvas objects.
In a razor page, the using statement is prefixed with an @ character and the semicolon at the end of the statement is optional. Add the following code to your Index.razor file after the @Page declaration:
In your Program.cs file, the HttpClient object was added as a dependency. To access the object in the view, you need to inject the service by using the @inject directive. Add the code in the following snippet after your @using statements in your Index.razor file:
Next, you'll include an H2 element to give the view the title Time Entry Status.
After the H2 element, you'll create a Div element to hold the timeline which is an HTML Canvas element represented by the BECanvas object (Blazor.Extensions.Canvas). You'll include an @ref="_canvasReference" attribute as part of the BECanvas element so that, when the HTML element is created, your code's _canvasReference variable will be given a reference to the BECanvas element so that you can interact with it.
Add the code in the following snippet after your @inject directive in your Index.razor file:
You'll now add the Select element that will hold the list of employees. The select element will be given an @onchange attribute that will call your code's OnChangeEmployeeList event handler whenever the user selects an employee.
Because the view will be sending a request to a web service for the list of employees, there's a chance that the results won't be available when the view is ready to render. You'll use an @if statement to make sure you have data before trying to loop through the list of employees to populate the select element.
Once the data has been retrieved, Blazor will automatically run your code because the @if statement will indicate that there's data. At that point, your code will use an @foreach loop to iterate over the employee data adding an Option element for each employee.
The Timesheet API uses pagination so it's possible that there will be multiple pages of employees. If there are additional pages of data, the NextPageURI property will hold a value that isn't 'N/A'. If a page other than the first page is requested, the PrevPageURI property will hold a value that isn't 'N/A'. These properties might also be null if the Employees/Me endpoint was used because the logged in user doesn't have security access to the Employees endpoint.
Rather than display buttons that may never be needed, their HTML will be surrounded by an @if statement so that the buttons are only rendered if needed.
An @onclick attribute will be defined for each button that will call your code if the user clicks the button.
Add the code in the following snippet, after the div for your BECanvas element, in your Index.razor file:
That's all there is for the view's HTML. Your next step is to write the code for the view by including an @code section.
The code in a razor file is included within an @code { } block. The @code block for this view will start off with some constants and variables for use by the rest of the code.
Add the contents of the following code snippet at the end of your Index.razor file:
With your global variables, objects, and constants defined, your next step is to define the OnInitializedAsync method.
The OnInitializedAsync method is one of Blazor's life cycle methods that's called after the component has been initialized. The canvas element won't be available at this point, but you can make requests to the Dovico Timesheet API at this point. The following web page has more information about Blazor's life cycle methods: https://docs.microsoft.com/en-us/aspnet/core/blazor/components/lifecycle?view=aspnetcore-3.1
You'll use the OnInitializedAsync method to call the LoadEmployeesAsync helper method, that you'll define in a moment, asking it to request the list of employees from the Dovico Timesheet API. If the call fails with an Unauthorized status code, your code will call the LoadEmployeesAsync method again but asking it to call the API's Employees/Me endpoint instead.
Add the OnInitializedAsync method in the following snippet at the end of your Index.razor file but before the @code's closing curly brace:
The next method you need to define is the LoadEmployeesAsync method.
The LoadEmployeesAsync method first sets the EmployeeResponse object to null so that the view's employees element is cleared. It then flags that processing is happening by setting the _IndicateProcessing global variable to true. Then, it calls the DrawTimelineAsync method to draw the timeline with the processing text overlaid.
If the LoadEmployeesAsync method is called by the OnInitializedAsync, the canvas won't be ready yet so the call to DrawTimelineAsync won't actually draw anything. The canvas will only become available to your code in the OnAfterRenderAsync method that you'll see shortly. The canvas will likely be ready if this method is called when the user clicks on the previous or next page button.
Because the processing flag (_IndicateProcessing) is set to true, if the OnAfterRenderAsync method is called while this method is still processing, it will also call the DrawTimelineAsync method which will show the processing text at that point.
After calling the DrawTimelineAsync method to indicate processing, this method will then request the data from the API endpoint specified in the uri parameter. If the HTTP response indicates success, the JSON string is parsed and placed in the EmployeeResponse object which will cause the view's employee list to be populated automatically by Blazor because the object is no longer null.
Finally, this method ends by flagging that processing is no longer occurring and then returns the HttpResponseMessage object to the calling method so that it can check to see if the API call was successful and what the status code was.
Add the code in the following snippet to the end of your Index.razor file but before the @code's closing curly brace:
The next methods that you need to define are for your previous and next page buttons.
The first paging methods needed are IsThereAPrevousPage and IsThereANextPage. These methods are used by the @if statement in the HTML to determine if the previous or next buttons should be rendered. If the EmployeeResponse object's PrevPageURI property is null or 'N/A' then the previous page button won't be displayed. Likewise, if the NextPageURI property is null or 'N/A' then the next page button won't be displayed.
The next two paging methods that you need to define are the OnClickPreviousPage and OnClickNextPage event handlers. These methods are called when the previous or next button, respectively, is clicked on. When the button is clicked, the method will pass the PreviousPageURI or NextPageURI value to the LoadEmployeesAsync method to have that page of employee data pulled from the Dovico Timesheet API.
Add the code in the following snippet before the @code's closing curly brace at the end of your Index.razor file:
The next method you need to define is the OnChangeEmployeeList method.
The OnChangeEmployeeList method is called when the user clicks on an employee in the employee list. Your method will indicate that the view is processing so that the timeline displays the processing text. Then it will call the LoadTimeEntriesAsync method passing in a URI requesting the selected employee's time entries over the past 30 days.
The list of time entries will be returned by the API grouped by unapproved time and then approved time. Your method will sort the received list of time entries by date instead.
The method will then indicate that processing is over and will call the DrawTimelineAsync method passing in the employee object that belongs to the selected employee. This will cause the timeline to draw the selected employee's time entry statuses.
Add the code in the following snippet to the end of your Index.razor file before the @code's closing curly brace:
The next method to define is the LoadTimeEntriesAsync method.
The LoadTimeEntriesAsync method requests the time entries from the Dovico Timesheet API that are within the date range specified. If time entries are returned, they will be added to the _TimeEntries global variable.
Because time entry data is returned from the Dovico Timesheet API using pagination, it's possible that there are multiple pages of time that need to be requested. If there's a next page of time data available, this method will call itself again passing in the NextPageURI to pull the next page of data.
Add the code in the following snippet to the end of your Index.razor file before the @code's closing curly brace:
The next method to define is the OnAfterRenderAsync method.
The OnAfterRenderAsync method is another Blazor lifecycle method that you need to implement because the HTML Canvas element only becomes available to your code at this point.
This method gets called when the page initially renders but also when a selection is changed in the employee list and when the canvas is drawn. The code in this method only needs to run once so you'll check the FirstRender parameter to see if it's true.
This method will get the Canvas element's 2D context, calculate some font heights, and will then draw the initial timeline.
I'm not going to go into detail about the drawing calls used for a canvas element in this article but, if you're interested, the following web page has an excellent tutorial: http://diveintohtml5.info/canvas.html
Add the code in the following snippet before the @code's closing curly brace at the end of your Index.razor file:
The next method to define is the DrawTimelineAsync method.
The DrawTimelineAsync method is responsible for drawing the timeline if the canvas' 2D context has been obtained. If the context hasn't yet been obtained, there's no way to draw the canvas so the method exits.
The method starts off by making some calculations like where the top of the blue background will start to give room for the month's abbreviation above the timeline. It will determine how wide each day can be based on the width of the canvas and the 31 days of time that will be displayed.
One thing to note is that, although your code is written in C#, the Canvas element is an HTML element on the web page and your C# code is running in the mono runtime. The mono runtime is compiled to WebAssembly and running side-by-side with the JavaScript of the web page but there's a penalty for switching contexts. Depending on how many calls you make, and depending on the browser, this may be noticeable.
When dealing with the canvas, one thing you can do is batch your calls by first calling the context's BeginBatchAsync method and then the EndBatchAsync method when you've finished specifying all the calls. I've noticed that the MeasureTextAsync method doesn't work when you use the BeginBatchAsync and EndBatchAsync methods but you can still use the methods to batch some of the calls where the MeasureTextAsync method isn't used.
Another thing to be aware of is that the mono runtime and your code are running in the same thread as the UI. It's good practice to make all methods asynchronous if they do processing so that your web page doesn't become unresponsive.
Add the code in the following snippet before the @code's closing curly brace at the end of your Index.razor file:
The next method to define is the GetTextHeightAsync method.
At the moment, the canvas method MeasureTextAsync only returns a Width value with the rest of the properties set to zero. As a result, the GetTextHeightAsync method has been created to return the approximate height of the text based on the font information specified. Measuring the width of an M character returns a width that is close to the height of the text.
Add the code in the following snippet to the end of your Index.razor file before the @code's closing curly brace:
The next method to define is the DrawNonWorkingDayBackgroundAsync method.
The DrawNonWorkingDayBackgroundAsync method draws a slightly darker background on days that are non-working days for the selected employee. If there isn't an employee selected, the default non-working days are Saturday and Sunday.
Add the code in the following snippet, before the @code's closing curly brace, at the end of your Index.razor file:
The next methods to define are the DrawMonthAbbreviationAsync, DrawDayOfMonthAsync, DrawTodayStringAsync and methods.
The first method is the DrawMonthAbbreviationAsync method that draws the month's abbreviation (Sep for September for example) at the location specified. The method also returns the right edge of the text that was drawn so that the timeline doesn't draw over the previous abbreviation if the month changes early on the timeline.
The second method is the DrawDayOfMonthAsync method that draws the date's day of the month value (28, 29, 30 for example) along the top of the timeline.
The third method is the DrawTodayStringAsync method that draws the current date under the timeline at the right edge of the canvas to indicate the last date displayed on the timeline.
Add the code in the following snippet, before the @code's closing curly brace, at the end of your Index.razor file:
The next method to define is the DrawStatusesAsync method.
The DrawStatusesAsync method first loops through the selected employee's time to see if there's time at the current date on the timeline and if the time's status is rejected, unsubmitted, under review, or approved. If a time entry was found for each status, the loop will exit.
Following the loop, if time was found for a status, the DrawTriangleAsync method is called to draw a triangle indicating the status.
Add the code in the following snippet to the end of your Index.razor file before the @code's closing curly brace:
The next method to define is the DrawTriangleAsync method.
The DrawTriangleAsync method draws a triangle at the specified location using the colors provided.
Add the code in the following snippet to the end of your Index.razor file but before the @code's closing curly brace:
The next method to define is the DrawLegendAsync method.
The DrawLegendAsync method draws a legend under the timeline, starting at the left edge of the canvas, to indicate which time entry status each triangle color represents.
Add the code in the following snippet before the @code's closing curly brace at the end of your Index.razor file:
The next method you need to define is the DrawProcessingAsync method.
If the view indicates that there's processing occurring, the DrawProcessingAsync method draws an opaque layer over the canvas and then draws the text "Processing... One moment please." horizontally and vertically centered on the canvas.
Add the code in the following snippet before the @code's closing curly brace at the end of your Index.razor file:
The final method to define is the DrawTextAsync method.
The DrawTextAsync method draws the text at the location specified and accepts several optional parameters for controlling the text color and alignment. The method also returns the width of the text that was drawn in the event the calling method needs that information.
Add the code in the following snippet before the @code's closing curly brace at the end of your Index.razor file:
That's it for the Time Entry Status view itself.
The next section is optional and will walk you through adjusting a few things with the Blazor application to customize it. If you wish to skip the customizations, you can jump ahead to the Viewing the results section.
When you create a Blazor WebAssembly application, the template adds three views to show you some of what's possible. You just reworked the Home (Index) view but the other two views, Counter and Fetch data, aren't needed.
The following are the steps to remove the Counter and Fetch data views:
To remove the About bar at the top of the Time Entry Status view:
With the customizations to the Blazor WebAssembly application complete, it's time to view the results.
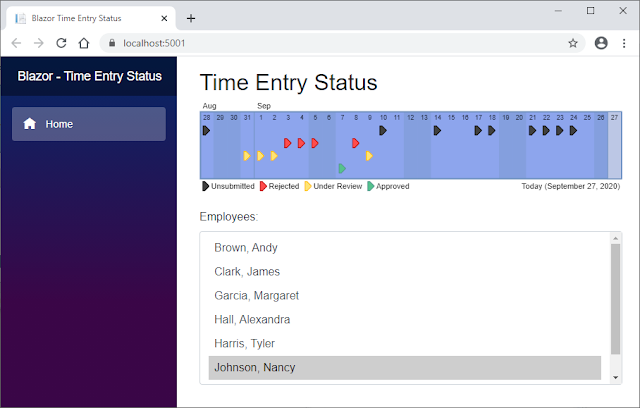
As shown in the following image, if you run the application, you'll see the Time Entry Status view with your C# code running in a browser via WebAssembly!
Clicking on an employee in the list should show you the statuses of any time that has been entered for that employee in the previous 30 days. Note that the list of employees and statuses will differ if you're connected to a different Dovico Timesheet database.

(click to view the image full size)
Before I end this article, I want to point out some security considerations that apply not only to Blazor WebAssembly applications but also web applications in general.
Because you're writing code with C#, it's easy to forget that the code isn't running on a server when you build a Blazor WebAssembly application. All of your code is downloaded and executed in the browser by the mono runtime. You shouldn't include anything in your codebase that you don't want others to see.
Also, even though you may use code like the HttpClient class, under the hood, Blazor is actually using the browser's Fetch API to make the HTTP calls. It's really easy to inspect HTTP requests from a web page. For example, the following screenshot is showing the network tab of the Chrome browser's developer tools when the employee, Nancy Johnson, is selected. As you can see in the bottom-right corner, the request headers are visible:

In this article you learned the following:
Disclaimer: I was not paid to write this article but but I do work for Dovico Software. I also receive royalties on the sale of the book "WebAssembly in Action".
- Creating a Blazor WebAssembly application
- Responding to events from the controls on your web page
- Calling the Dovico Timesheet API
- Drawing on an HTML canvas element from C#
Recently, a customer contacted the company I work for looking for the Time Entry Status app that we used to offer on our website. It was a small Java app that I wrote in 2011 to accompany Dovico's new Timesheet API that I was creating at the time.
As shown in the following screen shot, the app gives you a bird's eye view of the selected employee's time over the past 30 days. Red indicates there's rejected time, black is time that hasn't been submitted, yellow is time that's awaiting approval, and blue is time that has been approved. If there's no triangle then there's no time entered for that day.

(click to view the image full size)
The app is very useful if you want to quickly verify that your employees submitted their time before you run your reports or generate your invoices. It's also helpful for employees who want to quickly check to make sure that all of their time is in and has been submitted.
Over the past few weeks, I've been digging into WebAssembly from a C# perspective for an article that I'm writing. Although I've been following a number of WebAssembly related C# technologies like mono, the Uno Platform, and Blazor, I felt that I'd get more out of my learning by building something.
Fortunately, Dovico recently gave me some spare time to research into anything that interested me, so I decided to use that time to dig into Blazor by rewriting this application. In the process, a few adjustments were made to the timeline to modernize its look a bit as shown in the following image.

(click to view the image full size)
This article will walk you through the steps to re-create the Time Entry Status app using Blazor WebAssembly.
The Time Entry Status view will consist of two main elements as shown in the following image. The timeline will be drawn using an HTML Canvas element via the Blazor.Extensions.Canvas nuget package. The list of employees will use an HTML Select element.

(click to view the image full size)
As shown below, the following are the steps for building this application:
- Create a Blazor WebAssembly project
- Install and configure the Blazor.Extensions.Canvas nuget package that will make interacting with a canvas element easier from C#
- Create the models for Dovico Timesheet's data
- Build the Time Entry Status view

(click to view the image full size)
As the following image shows, your first step is to create a Blazor WebAssembly project.
1. Create a Blazor WebAssembly project
This article will be using Visual Studio 2019 to build the application, but Visual Studio Code can also be used. If you’d prefer to use Visual Studio Code, the following web page walks you through the steps to create a Blazor WebAssembly project using that IDE: https://docs.microsoft.com/en-us/learn/modules/build-blazor-webassembly-visual-studio-code/
Open Visual Studio 2019 and choose Create a new project
- Under C#, choose Blazor App and click Next.
- Give the project a name. I called mine BlazorTimeEntryStatus but you can use a different name if you'd like. Click Create.
- At this point, you'll be presented with a second dialog as shown in the following image. Select Blazor WebAssembly App and then click Create.

The application you're about to build will be pulling its information from a Dovico Timesheet demo database via the Dovico Timesheet API. Signing up for a demo database is free and is good for 30 days. To sign up, click the Try for free button at the top of the Dovico website: https://www.dovico.com/
The Dovico Timesheet API expects every call to include an Authorization header in the following format:
WRAP access_token="client=ConsumerSecret&user_token=DataAccessToken"
The Consumer secret and Data access token values can be found in the Company view (Setup menu) of Dovico Timesheet in the API tab.
WARNING: The data access token found in the Company view is a system-wide access token with full access to all data and that might not be what you want depending on your use for the API. Each employee also has a data access token that restricts data to only what their security settings allow. The employee data access token of the logged in user can be found by moving your mouse over your name in the top-right corner of Dovico Timesheet and choosing Settings from the drop-down menu.
The Dovico Timesheet API was designed when a lot of applications were still using XML and, as a result, the data is returned in XML format by default. To change the response to JSON, you'll need to include an Accept header with the value application/json. For more information about the Dovico Timesheet API, the documentation can be found at the following website: https://www.dovico.com/developer/API_doc/
Rather than have your code specify the Authorization and Accept headers every time you send a request to the API, you'll modify the HttpClient object in the Program.cs file, to specify the headers in the DefaultRequestHeaders property. Once set, every HTTP request your application makes will include the request headers automatically.
WARNING: Your Blazor WebAssembly code might be written in C# but it will be downloaded and run in the browser. You shouldn't include anything in your codebase that you don't want someone outside your organization seeing. Also, even though your code will be using the HttpClient class, under the hood it will be using the browser's Fetch API and it's very easy to inspect HTTP requests from a browser using the browser's built-in developer tools. I'll write articles in the future that dig into securing the HTTP requests but for now the following website has some tips: https://docs.microsoft.com/en-us/aspnet/core/blazor/security/webassembly/?view=aspnetcore-3.1
Open the Program.cs file and adjust the Main function to now have the code shown in the following code snippet. Note that the AccessToken string shown in the following snippet will need to be adjusted to match the values from your demo database as the ones shown here might be expired depending on when you read this article.
public static async Task Main(string[] args)
{
{
var builder = WebAssemblyHostBuilder.CreateDefault(args);
builder.RootComponents.Add<app>("app");
HttpClient Http = new HttpClient
{
// Set the default request headers for all HTTP calls
string AccessToken =
"access_token=\"client=a09af4b31071467dbd1730cd19a6b162.145303&user_token=3aa1215e1e2b447bb8458d7997d0a011.145303\"";
Http.DefaultRequestHeaders.Authorization = new AuthenticationHeaderValue("WRAP",
AccessToken);
Http.DefaultRequestHeaders.Accept.Clear();
Http.DefaultRequestHeaders.Accept.Add(
new MediaTypeWithQualityHeaderValue("application/json"));
// Add the HttpClient to the services collection
builder.Services.AddScoped(sp => Http);
await builder.Build().RunAsync();
}
builder.RootComponents.Add<app>("app");
HttpClient Http = new HttpClient
{
BaseAddress = new Uri(builder.HostEnvironment.BaseAddress)
};
// Set the default request headers for all HTTP calls
string AccessToken =
"access_token=\"client=a09af4b31071467dbd1730cd19a6b162.145303&user_token=3aa1215e1e2b447bb8458d7997d0a011.145303\"";
Http.DefaultRequestHeaders.Authorization = new AuthenticationHeaderValue("WRAP",
AccessToken);
Http.DefaultRequestHeaders.Accept.Clear();
Http.DefaultRequestHeaders.Accept.Add(
new MediaTypeWithQualityHeaderValue("application/json"));
// Add the HttpClient to the services collection
builder.Services.AddScoped(sp => Http);
await builder.Build().RunAsync();
You will also need to include the following using statement at the beginning of the Program.cs file:
using System.Net.Http.Headers;
With the project created and the default HTTP request headers specified, your next step as shown in the following image, is to install and configure the Blazor.Extensions.Canvas nuget package. This package will make interacting with an HTML Canvas element easier from C#.
2. The Blazor.Extensions.Canvas nuget package
The timeline portion of the view, as shown in the following image, will be drawn using an HTML canvas element and will be adjusted from C# by using the Blazor.Extensions.Canvas nuget package. More information about this package can be found by visiting the following web page: https://www.nuget.org/packages/Blazor.Extensions.Canvas/1.0.0
To install the package, click on the Tools, NuGet Package Manager, Package Manager Console menu item and then run the following command:
Install-Package Blazor.Extensions.Canvas -Version 1.0.0
Open your _Imports.razor file and add the following using statement after the other using statements:
@using Blazor.Extensions.Canvas
In your Solution Explorer, expand the wwwroot folder, and then open the index.html file. Add the following script tag just before the </head> tag:
<script src="_content/Blazor.Extensions.Canvas/blazor.extensions.canvas.js"></script>
With the Blazor.Extensions.Canvas nuget package installed and configured your next step, as shown in the following image, is to define the models for Dovico Timesheet's data.
3. Create the models for Dovico Timesheet's data
When the view is first displayed, it will call the Dovico Timesheet API for the list of employees. If you use an individual employee's data access token for the call, the employee might not have permission to the Employees endpoint. If the request for employees fails with an Unauthorized status code, the view will then call the Employees/Me endpoint for the logged in employee's basic information.
The response data returned from both endpoints will be similar, but the Employees/Me response data will only hold the employee's ID, first name, and last name. The PrevPageURI, NextPageURI, and WorkDays properties won't be present in the Employees/Me response data.
The WorkDays value is used by the view to give a slightly darker background on the timeline for the days that the employee isn't scheduled to work. The Employee model will set the WorkDays default value to indicate that Saturday and Sunday are non-working days in the event the API call does not return the WorkDays property.
In the Solution Explorer, right-click on your project and choose Add, New Folder from the context menu. Give the folder the name Models.
Right-click on the Models folder and choose Add, Class... from the context menu. Give the class the name Employee.
In your new Employee.cs file, replace the generated Employee class with the code from the following snippet:
public class EmployeeResponse
{
public class Employee
{
{
public List<Employee> Employees { get; set; }
// NOTE: An Employees/Me/ call will not include the following properties in its response
public string PrevPageURI { get; set; }
public string NextPageURI { get; set; }
}
// NOTE: An Employees/Me/ call will not include the following properties in its response
public string PrevPageURI { get; set; }
public string NextPageURI { get; set; }
public class Employee
{
// If the logged in user doesn't have permission to call Employees/, you'll call
// Employees/Me/ instead. Unfortunately, that call doesn't return a WorkDays value so you
// need to make sure the _WorkDaysArray is populated with a default value.
public Employee() { SetWorkDays(_WorkDays); }
public string ID { get; set; }
public string FirstName { get; set; }
public string LastName { get; set; }
// Indicates which days the employee works (can be different for each employee). The dot
// indicates a non-working day.
protected string _WorkDays = ".MTWTF.";
public string WorkDays
{
protected List<bool> _WorkDaysArray = new List<bool>();
protected void SetWorkDays(string WorkDays)
{
// DayOfWeek is a zero-based value starting with Sunday
public bool IsWorkingDay(DayOfWeek Day) { return _WorkDaysArray[(int)Day]; }
}
// Employees/Me/ instead. Unfortunately, that call doesn't return a WorkDays value so you
// need to make sure the _WorkDaysArray is populated with a default value.
public Employee() { SetWorkDays(_WorkDays); }
public string ID { get; set; }
public string FirstName { get; set; }
public string LastName { get; set; }
// Indicates which days the employee works (can be different for each employee). The dot
// indicates a non-working day.
protected string _WorkDays = ".MTWTF.";
public string WorkDays
{
get { return _WorkDays; }
set { SetWorkDays(value); }
}
set { SetWorkDays(value); }
protected List<bool> _WorkDaysArray = new List<bool>();
protected void SetWorkDays(string WorkDays)
{
// Remember the original string
_WorkDays = WorkDays;
// Create the WorkDays array. Each day that is not a dot is a workday.
_WorkDaysArray.Clear();
foreach (char Day in WorkDays) { _WorkDaysArray.Add((Day != '.')); }
}
_WorkDays = WorkDays;
// Create the WorkDays array. Each day that is not a dot is a workday.
_WorkDaysArray.Clear();
foreach (char Day in WorkDays) { _WorkDaysArray.Add((Day != '.')); }
// DayOfWeek is a zero-based value starting with Sunday
public bool IsWorkingDay(DayOfWeek Day) { return _WorkDaysArray[(int)Day]; }
The Time Entry Status view will present the employees to the user in an HTML Select element. When the user selects an employee, that employee's time information will be requested from the Dovico Timesheet API to render the timeline.
Your next step is to create the models for the time entry information that you'll need from the API.
The API will return the time entry's date as a string in the format yyyy-MM-dd. To make working with the data easier, your model will convert the string into a DateTime object.
Right-click on your Models folder again and choose Add, Class... from the context menu. Give the class the name TimeEntry.
In your TimeEntry.cs file, replace the generated TimeEntry class with the code from the following snippet:
public class TimeEntryResponse
{
public class TimeEntry
{
public class Sheet
{
{
public List<TimeEntry> TimeEntries { get; set; }
public string PrevPageURI { get; set; }
public string NextPageURI { get; set; }
}
public string PrevPageURI { get; set; }
public string NextPageURI { get; set; }
public class TimeEntry
{
public string ID { get; set; }
public Sheet Sheet { get; set; }
protected string _DateString = "";
public string Date
{
// Needed so that you can sort and compare based on the date value
protected DateTime _Date = DateTime.MinValue;
public DateTime TheDate { get { return _Date; } }
protected void SetDate(string Date)
{
}
public Sheet Sheet { get; set; }
protected string _DateString = "";
public string Date
{
get { return _DateString; }
set { SetDate(value); }
}
set { SetDate(value); }
// Needed so that you can sort and compare based on the date value
protected DateTime _Date = DateTime.MinValue;
public DateTime TheDate { get { return _Date; } }
protected void SetDate(string Date)
{
// Remember the original string
_DateString = Date;
_Date = DateTime.ParseExact(Date, "yyyy-MM-dd", CultureInfo.InvariantCulture);
}
_DateString = Date;
_Date = DateTime.ParseExact(Date, "yyyy-MM-dd", CultureInfo.InvariantCulture);
public class Sheet
{
public string ID { get; set; }
public string Status { get; set; }
}
public string Status { get; set; }
You need to include the following using statement at the beginning of the TimeEntry.cs file because of the use of the CultureInfo class when parsing the date:
using System.Globalization;
With the models now created, you're ready to build the Time Entry Status view itself which is your next step as shown in the following image.
4. Build the Time Entry Status view
Rather than creating a new page for the Time Entry Status view, you'll modify the generated Index.razor file.
Blazor uses razor pages which are a combination of razor markup, HTML and C# code. More information about razor pages can be found on the following web page: https://docs.microsoft.com/en-us/aspnet/core/mvc/views/razor?view=aspnetcore-3.1
In the Solution Explorer, expand the Pages folder, and open the Index.razor file. Delete everything from the file after the @Page declaration.
The first thing that you need to add to the page are the using statements for the models that you just built as well as the Blazor.Extensions.Canvas objects.
In a razor page, the using statement is prefixed with an @ character and the semicolon at the end of the statement is optional. Add the following code to your Index.razor file after the @Page declaration:
@using BlazorTimeEntryStatus.Models;
@using Blazor.Extensions;
@using Blazor.Extensions.Canvas.Canvas2D;
@using Blazor.Extensions.Canvas.Model;
@using Blazor.Extensions;
@using Blazor.Extensions.Canvas.Canvas2D;
@using Blazor.Extensions.Canvas.Model;
NOTE: If you used a different name for your project, the namespace for the Models in the previous snippet will need to be adjusted to match your namespace.
In your Program.cs file, the HttpClient object was added as a dependency. To access the object in the view, you need to inject the service by using the @inject directive. Add the code in the following snippet after your @using statements in your Index.razor file:
@inject HttpClient Http;
Next, you'll include an H2 element to give the view the title Time Entry Status.
After the H2 element, you'll create a Div element to hold the timeline which is an HTML Canvas element represented by the BECanvas object (Blazor.Extensions.Canvas). You'll include an @ref="_canvasReference" attribute as part of the BECanvas element so that, when the HTML element is created, your code's _canvasReference variable will be given a reference to the BECanvas element so that you can interact with it.
Add the code in the following snippet after your @inject directive in your Index.razor file:
<h2>Time Entry Status</h2>
<div class="form-group">
<div class="form-group">
<BECanvas Width="600" Height="129" @ref="_canvasReference"></BECanvas>
</div>
You'll now add the Select element that will hold the list of employees. The select element will be given an @onchange attribute that will call your code's OnChangeEmployeeList event handler whenever the user selects an employee.
Because the view will be sending a request to a web service for the list of employees, there's a chance that the results won't be available when the view is ready to render. You'll use an @if statement to make sure you have data before trying to loop through the list of employees to populate the select element.
Once the data has been retrieved, Blazor will automatically run your code because the @if statement will indicate that there's data. At that point, your code will use an @foreach loop to iterate over the employee data adding an Option element for each employee.
The Timesheet API uses pagination so it's possible that there will be multiple pages of employees. If there are additional pages of data, the NextPageURI property will hold a value that isn't 'N/A'. If a page other than the first page is requested, the PrevPageURI property will hold a value that isn't 'N/A'. These properties might also be null if the Employees/Me endpoint was used because the logged in user doesn't have security access to the Employees endpoint.
Rather than display buttons that may never be needed, their HTML will be surrounded by an @if statement so that the buttons are only rendered if needed.
An @onclick attribute will be defined for each button that will call your code if the user clicks the button.
Add the code in the following snippet, after the div for your BECanvas element, in your Index.razor file:
<div class="form-group">
<label for="employeeList">Employees:</label>
<select id="employeeList" class="form-control" size="6"
@onchange="OnChangeEmployeeList">
<div class="p-2 d-flex justify-content-center">
</div>
<select id="employeeList" class="form-control" size="6"
@onchange="OnChangeEmployeeList">
@if (EmployeeResponse != null)
{
</select>
{
@foreach (Employee employee in EmployeeResponse.Employees)
{
}
{
<option class="p-2" value="@employee.ID">@employee.LastName, @employee.FirstName</option>
}
<div class="p-2 d-flex justify-content-center">
@if (IsThereAPreviousPage())
{
@if (IsThereANextPage())
{
</div>
{
<input type="button" class="btn btn-primary m-2" value="< Previous Employees"
@onclick="OnClickPreviousPage" />
}
@onclick="OnClickPreviousPage" />
@if (IsThereANextPage())
{
<input type="button" class="btn btn-primary m-2" value="Next Employees >"
@onclick="OnClickNextPage" />
}
@onclick="OnClickNextPage" />
That's all there is for the view's HTML. Your next step is to write the code for the view by including an @code section.
The @code section
The code in a razor file is included within an @code { } block. The @code block for this view will start off with some constants and variables for use by the rest of the code.
Add the contents of the following code snippet at the end of your Index.razor file:
@code {
const string _RootUri = "https://api.dovico.com/";
const string API_VERSION = "7";
const string API_DATE_FORMAT = "yyyy-MM-dd";
const string URI_NOT_AVAILABLE = "N/A";
const int TIMELINE_HEIGHT = 95; // The blue part of the timeline
const int TIMELINE_BORDER_WIDTH = 2;
const int DAY_QUARTER_HEIGHT = 18; // 4 rows with a bit of vertical padding between each
const int DATE_RANGE_DAYS = 30;
const string TIMELINE_BACKGROUND_COLOR = "rgb(141, 165, 237)";
const string TIMELINE_BORDER_COLOR = "rgb(112, 146, 190)";
const string NON_WORKING_DAY_BACKGROUND_COLOR = "rgba(112, 146, 190, 0.3)";
const string TODAY_BACKGROUND_COLOR = "rgb(188, 199, 229)";
const string TEXT_COLOR = "black";
const string PROCESSING_TEXT_BACKGROUND_COLOR = "rgba(0, 0, 0, 0.5)";
const string PROCESSING_TEXT_COLOR = "white";
const string STATUS_COLOR_REJECTED_BORDER = "rgb(178, 0, 0)";
const string STATUS_COLOR_REJECTED_FILL = "rgb(255, 76, 76)";
const string STATUS_COLOR_UNSUBMITTED_FILL = "rgb(64, 64, 64)";
const string STATUS_COLOR_UNSUBMITTED_BORDER = "rgb(0, 0, 0)";
const string STATUS_COLOR_UNDER_REVIEW_FILL = "rgb(255, 227, 117)";
const string STATUS_COLOR_UNDER_REVIEW_BORDER = "rgb(255, 183, 0)";
const string STATUS_COLOR_APPROVED_FILL = "rgb(85, 193, 141)";
const string STATUS_COLOR_APPROVED_BORDER = "rgb(85, 147, 141)";
const string FONTINFO_ARIAL_9 = "9px arial";
const string FONTINFO_ARIAL_11 = "11px arial";
const string FONTINFO_ARIAL_26_BOLD = "bold 26px arial";
// Dates with the time portion zeroed out
DateTime _StartDate = DateTime.Now.Date.AddDays(-DATE_RANGE_DAYS);
DateTime _EndDate = DateTime.Now.Date;
// Calculated in the OnAfterRenderAsync method
double _TextHeightArial9 = 0.0;
double _TextHeightArial11 = 0.0;
double _TextHeightArial26Bold = 0.0;
// Canvas drawing references
Canvas2DContext _context = null;
BECanvasComponent _canvasReference;
// Will hold the data received from the API
EmployeeResponse EmployeeResponse = null;
List<TimeEntry> _TimeEntries = new List<TimeEntry>();
bool _IndicateProcessing = false;
}
const string API_VERSION = "7";
const string API_DATE_FORMAT = "yyyy-MM-dd";
const string URI_NOT_AVAILABLE = "N/A";
const int TIMELINE_HEIGHT = 95; // The blue part of the timeline
const int TIMELINE_BORDER_WIDTH = 2;
const int DAY_QUARTER_HEIGHT = 18; // 4 rows with a bit of vertical padding between each
const int DATE_RANGE_DAYS = 30;
const string TIMELINE_BACKGROUND_COLOR = "rgb(141, 165, 237)";
const string TIMELINE_BORDER_COLOR = "rgb(112, 146, 190)";
const string NON_WORKING_DAY_BACKGROUND_COLOR = "rgba(112, 146, 190, 0.3)";
const string TODAY_BACKGROUND_COLOR = "rgb(188, 199, 229)";
const string TEXT_COLOR = "black";
const string PROCESSING_TEXT_BACKGROUND_COLOR = "rgba(0, 0, 0, 0.5)";
const string PROCESSING_TEXT_COLOR = "white";
const string STATUS_COLOR_REJECTED_BORDER = "rgb(178, 0, 0)";
const string STATUS_COLOR_REJECTED_FILL = "rgb(255, 76, 76)";
const string STATUS_COLOR_UNSUBMITTED_FILL = "rgb(64, 64, 64)";
const string STATUS_COLOR_UNSUBMITTED_BORDER = "rgb(0, 0, 0)";
const string STATUS_COLOR_UNDER_REVIEW_FILL = "rgb(255, 227, 117)";
const string STATUS_COLOR_UNDER_REVIEW_BORDER = "rgb(255, 183, 0)";
const string STATUS_COLOR_APPROVED_FILL = "rgb(85, 193, 141)";
const string STATUS_COLOR_APPROVED_BORDER = "rgb(85, 147, 141)";
const string FONTINFO_ARIAL_9 = "9px arial";
const string FONTINFO_ARIAL_11 = "11px arial";
const string FONTINFO_ARIAL_26_BOLD = "bold 26px arial";
// Dates with the time portion zeroed out
DateTime _StartDate = DateTime.Now.Date.AddDays(-DATE_RANGE_DAYS);
DateTime _EndDate = DateTime.Now.Date;
// Calculated in the OnAfterRenderAsync method
double _TextHeightArial9 = 0.0;
double _TextHeightArial11 = 0.0;
double _TextHeightArial26Bold = 0.0;
// Canvas drawing references
Canvas2DContext _context = null;
BECanvasComponent _canvasReference;
// Will hold the data received from the API
EmployeeResponse EmployeeResponse = null;
List<TimeEntry> _TimeEntries = new List<TimeEntry>();
bool _IndicateProcessing = false;
With your global variables, objects, and constants defined, your next step is to define the OnInitializedAsync method.
The OnInitializedAsync method
The OnInitializedAsync method is one of Blazor's life cycle methods that's called after the component has been initialized. The canvas element won't be available at this point, but you can make requests to the Dovico Timesheet API at this point. The following web page has more information about Blazor's life cycle methods: https://docs.microsoft.com/en-us/aspnet/core/blazor/components/lifecycle?view=aspnetcore-3.1
You'll use the OnInitializedAsync method to call the LoadEmployeesAsync helper method, that you'll define in a moment, asking it to request the list of employees from the Dovico Timesheet API. If the call fails with an Unauthorized status code, your code will call the LoadEmployeesAsync method again but asking it to call the API's Employees/Me endpoint instead.
Add the OnInitializedAsync method in the following snippet at the end of your Index.razor file but before the @code's closing curly brace:
protected override async Task OnInitializedAsync()
{
{
HttpResponseMessage response = await LoadEmployeesAsync(_RootUri +
"Employees/?version=" + API_VERSION);
if (!response.IsSuccessStatusCode &&
response.StatusCode == System.Net.HttpStatusCode.Unauthorized)
{
}
"Employees/?version=" + API_VERSION);
if (!response.IsSuccessStatusCode &&
response.StatusCode == System.Net.HttpStatusCode.Unauthorized)
{
await LoadEmployeesAsync(_RootUri + "Employees/Me/?version=" + API_VERSION);
}
The next method you need to define is the LoadEmployeesAsync method.
The LoadEmployeesAsync method
The LoadEmployeesAsync method first sets the EmployeeResponse object to null so that the view's employees element is cleared. It then flags that processing is happening by setting the _IndicateProcessing global variable to true. Then, it calls the DrawTimelineAsync method to draw the timeline with the processing text overlaid.
If the LoadEmployeesAsync method is called by the OnInitializedAsync, the canvas won't be ready yet so the call to DrawTimelineAsync won't actually draw anything. The canvas will only become available to your code in the OnAfterRenderAsync method that you'll see shortly. The canvas will likely be ready if this method is called when the user clicks on the previous or next page button.
Because the processing flag (_IndicateProcessing) is set to true, if the OnAfterRenderAsync method is called while this method is still processing, it will also call the DrawTimelineAsync method which will show the processing text at that point.
After calling the DrawTimelineAsync method to indicate processing, this method will then request the data from the API endpoint specified in the uri parameter. If the HTTP response indicates success, the JSON string is parsed and placed in the EmployeeResponse object which will cause the view's employee list to be populated automatically by Blazor because the object is no longer null.
Finally, this method ends by flagging that processing is no longer occurring and then returns the HttpResponseMessage object to the calling method so that it can check to see if the API call was successful and what the status code was.
Add the code in the following snippet to the end of your Index.razor file but before the @code's closing curly brace:
protected async Task<HttpResponseMessage> LoadEmployeesAsync(string uri)
{
{
EmployeeResponse = null;
// Flag that the view is processing and draw the timeline. Don't await DrawTimelineAsync.
// Request the list of employees while the timeline refreshes and shows the processing
// indicator.
_IndicateProcessing = true;
DrawTimelineAsync(null);
// Load the requested page of employees. If the call was successful then parse the JSON.
HttpResponseMessage response = await Http.GetAsync(uri);
if (response.IsSuccessStatusCode)
{
// Now that you have the list of employees, turn off the processing flag. Again, don't wait
// for the draw to finish.
_IndicateProcessing = false;
DrawTimelineAsync(null);
return response;
}
// Flag that the view is processing and draw the timeline. Don't await DrawTimelineAsync.
// Request the list of employees while the timeline refreshes and shows the processing
// indicator.
_IndicateProcessing = true;
DrawTimelineAsync(null);
// Load the requested page of employees. If the call was successful then parse the JSON.
HttpResponseMessage response = await Http.GetAsync(uri);
if (response.IsSuccessStatusCode)
{
EmployeeResponse =
await response.Content.ReadFromJsonAsync<EmployeeResponse>();
}
await response.Content.ReadFromJsonAsync<EmployeeResponse>();
// Now that you have the list of employees, turn off the processing flag. Again, don't wait
// for the draw to finish.
_IndicateProcessing = false;
DrawTimelineAsync(null);
return response;
The next methods that you need to define are for your previous and next page buttons.
The paging methods
The first paging methods needed are IsThereAPrevousPage and IsThereANextPage. These methods are used by the @if statement in the HTML to determine if the previous or next buttons should be rendered. If the EmployeeResponse object's PrevPageURI property is null or 'N/A' then the previous page button won't be displayed. Likewise, if the NextPageURI property is null or 'N/A' then the next page button won't be displayed.
The next two paging methods that you need to define are the OnClickPreviousPage and OnClickNextPage event handlers. These methods are called when the previous or next button, respectively, is clicked on. When the button is clicked, the method will pass the PreviousPageURI or NextPageURI value to the LoadEmployeesAsync method to have that page of employee data pulled from the Dovico Timesheet API.
Add the code in the following snippet before the @code's closing curly brace at the end of your Index.razor file:
protected bool IsThereAPreviousPage()
{
protected bool IsThereANextPage()
{
protected async Task OnClickPreviousPage(MouseEventArgs args)
{
protected async Task OnClickNextPage(MouseEventArgs args)
{
{
return (EmployeeResponse != null && EmployeeResponse.PrevPageURI != null
&& EmployeeResponse.PrevPageURI != URI_NOT_AVAILABLE);
}
&& EmployeeResponse.PrevPageURI != URI_NOT_AVAILABLE);
protected bool IsThereANextPage()
{
return (EmployeeResponse != null && EmployeeResponse.NextPageURI != null
&& EmployeeResponse.NextPageURI != URI_NOT_AVAILABLE);
}
&& EmployeeResponse.NextPageURI != URI_NOT_AVAILABLE);
protected async Task OnClickPreviousPage(MouseEventArgs args)
{
await LoadEmployeesAsync(EmployeeResponse.PrevPageURI);
}
protected async Task OnClickNextPage(MouseEventArgs args)
{
await LoadEmployeesAsync(EmployeeResponse.NextPageURI);
}
The next method you need to define is the OnChangeEmployeeList method.
The OnChangeEmployeeList method
The OnChangeEmployeeList method is called when the user clicks on an employee in the employee list. Your method will indicate that the view is processing so that the timeline displays the processing text. Then it will call the LoadTimeEntriesAsync method passing in a URI requesting the selected employee's time entries over the past 30 days.
The list of time entries will be returned by the API grouped by unapproved time and then approved time. Your method will sort the received list of time entries by date instead.
The method will then indicate that processing is over and will call the DrawTimelineAsync method passing in the employee object that belongs to the selected employee. This will cause the timeline to draw the selected employee's time entry statuses.
Add the code in the following snippet to the end of your Index.razor file before the @code's closing curly brace:
protected async Task OnChangeEmployeeList(ChangeEventArgs e)
{
{
// Flag that the view is processing and draw the timeline. Don't await DrawTimelineAsync.
// Request the list of time entries while the timeline refreshes and shows the processing
// indicator.
_IndicateProcessing = true;
DrawTimelineAsync(null);
string EmployeeID = e.Value.ToString();
// Clear the list of time entries just in case there are some from another employee. Load in
// the selected employee's time for the date range.
_TimeEntries.Clear();
await LoadTimeEntriesAsync(_RootUri + "TimeEntries/Employee/" + EmployeeID +
"/?version=" + API_VERSION + "&daterange=" +
_StartDate.ToString(API_DATE_FORMAT) + "%20" +
_EndDate.ToString(API_DATE_FORMAT));
// Sort the time entries by date. They were returned grouped by unapproved and then
// approved.
_TimeEntries.Sort((a, b) => a.TheDate.CompareTo(b.TheDate));
// Turn off the processing flag
_IndicateProcessing = false;
// Find the employee object belonging to the selected employee id. Redraw the timeline
// with the employee's time.
Employee Employee = EmployeeResponse.Employees.Find(item => item.ID == EmployeeID);
await DrawTimelineAsync(Employee);
}
// Request the list of time entries while the timeline refreshes and shows the processing
// indicator.
_IndicateProcessing = true;
DrawTimelineAsync(null);
string EmployeeID = e.Value.ToString();
// Clear the list of time entries just in case there are some from another employee. Load in
// the selected employee's time for the date range.
_TimeEntries.Clear();
await LoadTimeEntriesAsync(_RootUri + "TimeEntries/Employee/" + EmployeeID +
"/?version=" + API_VERSION + "&daterange=" +
_StartDate.ToString(API_DATE_FORMAT) + "%20" +
_EndDate.ToString(API_DATE_FORMAT));
// Sort the time entries by date. They were returned grouped by unapproved and then
// approved.
_TimeEntries.Sort((a, b) => a.TheDate.CompareTo(b.TheDate));
// Turn off the processing flag
_IndicateProcessing = false;
// Find the employee object belonging to the selected employee id. Redraw the timeline
// with the employee's time.
Employee Employee = EmployeeResponse.Employees.Find(item => item.ID == EmployeeID);
await DrawTimelineAsync(Employee);
The next method to define is the LoadTimeEntriesAsync method.
The LoadTimeEntriesAsync method
The LoadTimeEntriesAsync method requests the time entries from the Dovico Timesheet API that are within the date range specified. If time entries are returned, they will be added to the _TimeEntries global variable.
Because time entry data is returned from the Dovico Timesheet API using pagination, it's possible that there are multiple pages of time that need to be requested. If there's a next page of time data available, this method will call itself again passing in the NextPageURI to pull the next page of data.
Add the code in the following snippet to the end of your Index.razor file before the @code's closing curly brace:
protected async Task LoadTimeEntriesAsync(string uri)
{
{
// If time entries were returned, add them to the list.
TimeEntryResponse response = await Http.GetFromJsonAsync<TimeEntryResponse>(uri);
if (response.TimeEntries.Count > 0) { _TimeEntries.AddRange(response.TimeEntries); }
// If there's a next page of time entries, call this method again passing in the NextPageURI
if (response.NextPageURI != URI_NOT_AVAILABLE)
{
}
TimeEntryResponse response = await Http.GetFromJsonAsync<TimeEntryResponse>(uri);
if (response.TimeEntries.Count > 0) { _TimeEntries.AddRange(response.TimeEntries); }
// If there's a next page of time entries, call this method again passing in the NextPageURI
if (response.NextPageURI != URI_NOT_AVAILABLE)
{
await LoadTimeEntriesAsync(response.NextPageURI);
}
The next method to define is the OnAfterRenderAsync method.
The OnAfterRenderAsync method
The OnAfterRenderAsync method is another Blazor lifecycle method that you need to implement because the HTML Canvas element only becomes available to your code at this point.
This method gets called when the page initially renders but also when a selection is changed in the employee list and when the canvas is drawn. The code in this method only needs to run once so you'll check the FirstRender parameter to see if it's true.
This method will get the Canvas element's 2D context, calculate some font heights, and will then draw the initial timeline.
I'm not going to go into detail about the drawing calls used for a canvas element in this article but, if you're interested, the following web page has an excellent tutorial: http://diveintohtml5.info/canvas.html
NOTE: The tutorial interacts with the canvas context directly whereas, here, the Blazor.Extensions.Canvas objects are wrapping those calls. From what I can tell, here, all the methods are named the same but with the word Async on the end.
Add the code in the following snippet before the @code's closing curly brace at the end of your Index.razor file:
protected override async Task OnAfterRenderAsync(bool FirstRender)
{
{
// This method gets run multiple times but the following code only needs to run once
if (FirstRender)
{
}
if (FirstRender)
{
// Get the 2D context from the canvas
_context = await _canvasReference.CreateCanvas2DAsync();
// Rather than calculating these values every time the DrawTimelineAsync method is
// called, cache the values
_TextHeightArial9 = await GetTextHeightAsync(FONTINFO_ARIAL_9);
_TextHeightArial11 = await GetTextHeightAsync(FONTINFO_ARIAL_11);
_TextHeightArial26Bold = await GetTextHeightAsync(FONTINFO_ARIAL_26_BOLD);
// Straddle the pixels to prevent blurry horizontal and vertical lines
// (http://diveintohtml5.info/canvas.html).
await _context.TranslateAsync(0.5, 0.5);
// There's no employee selected at this point. Just draw the timeline itself.
await DrawTimelineAsync(null);
}
_context = await _canvasReference.CreateCanvas2DAsync();
// Rather than calculating these values every time the DrawTimelineAsync method is
// called, cache the values
_TextHeightArial9 = await GetTextHeightAsync(FONTINFO_ARIAL_9);
_TextHeightArial11 = await GetTextHeightAsync(FONTINFO_ARIAL_11);
_TextHeightArial26Bold = await GetTextHeightAsync(FONTINFO_ARIAL_26_BOLD);
// Straddle the pixels to prevent blurry horizontal and vertical lines
// (http://diveintohtml5.info/canvas.html).
await _context.TranslateAsync(0.5, 0.5);
// There's no employee selected at this point. Just draw the timeline itself.
await DrawTimelineAsync(null);
The next method to define is the DrawTimelineAsync method.
The DrawTimelineAsync method
The DrawTimelineAsync method is responsible for drawing the timeline if the canvas' 2D context has been obtained. If the context hasn't yet been obtained, there's no way to draw the canvas so the method exits.
The method starts off by making some calculations like where the top of the blue background will start to give room for the month's abbreviation above the timeline. It will determine how wide each day can be based on the width of the canvas and the 31 days of time that will be displayed.
One thing to note is that, although your code is written in C#, the Canvas element is an HTML element on the web page and your C# code is running in the mono runtime. The mono runtime is compiled to WebAssembly and running side-by-side with the JavaScript of the web page but there's a penalty for switching contexts. Depending on how many calls you make, and depending on the browser, this may be noticeable.
When dealing with the canvas, one thing you can do is batch your calls by first calling the context's BeginBatchAsync method and then the EndBatchAsync method when you've finished specifying all the calls. I've noticed that the MeasureTextAsync method doesn't work when you use the BeginBatchAsync and EndBatchAsync methods but you can still use the methods to batch some of the calls where the MeasureTextAsync method isn't used.
Another thing to be aware of is that the mono runtime and your code are running in the same thread as the UI. It's good practice to make all methods asynchronous if they do processing so that your web page doesn't become unresponsive.
Add the code in the following snippet before the @code's closing curly brace at the end of your Index.razor file:
protected async Task DrawTimelineAsync(Employee Employee)
{
{
// Exit if the Canvas isn't available
if (_context == null) { return; }
// Returned as long but it impacts the DayCellWidth calculation if left as a long
double CanvasHeight = _canvasReference.Height;
double CanvasWidth = _canvasReference.Width;
// Give a bit of space before the top of the timeline for the month abbreviation(s)
double TimelineTop = (_TextHeightArial11 + 5);
// Day (cell) calculations (Date Range is 30 days before today's date which is 31 days in
// total so add 1 to the days)
double DayCellWidth = ((CanvasWidth - TIMELINE_BORDER_WIDTH) /
(DATE_RANGE_DAYS + 1));
double HalfDayCellWidth = (DayCellWidth / 2);
double DayTop = (TimelineTop + DAY_QUARTER_HEIGHT);
// Clear the previous drawing. Need to start at -0.5 because of the call to TranslateAsync
// in the OnAfterRenderAsync method to straddle the pixels so that a 1 pixel line is actually
// 1 pixel wide.
await _context.ClearRectAsync(-0.5, -0.5, CanvasWidth, CanvasHeight);
// Fill the timeline's background with the blue
await _context.SetFillStyleAsync(TIMELINE_BACKGROUND_COLOR);
await _context.FillRectAsync(0, TimelineTop, CanvasWidth, TIMELINE_HEIGHT);
// Draw the border
await _context.BeginPathAsync(); // Clears previous lines that were drawn
await _context.SetLineWidthAsync(TIMELINE_BORDER_WIDTH);
await _context.SetStrokeStyleAsync(TIMELINE_BORDER_COLOR);
await _context.StrokeRectAsync(1, TimelineTop,
(CanvasWidth - TIMELINE_BORDER_WIDTH - 1), TIMELINE_HEIGHT);
// Set the stroke to a width of 1 for the rest of the lines
await _context.SetLineWidthAsync(1);
int CurrentDayIndex = 0;
double MonthRightX = 0.0;
double X = 0.0;
double Y = 0.0;
DateTime LoopDate = _StartDate;
while (LoopDate <= _EndDate)
{
// Draw the legend under the timeline (+ 2 so there's a bit of padding between the bottom
// of the timeline and top of the triangles)
Y = (TimelineTop + TIMELINE_HEIGHT + 2);
await DrawLegendAsync(4, Y);
// Draw Today's date (e.g. 'Today (July 15, 2020)') below the timeline
await DrawTodayStringAsync((X - TIMELINE_BORDER_WIDTH), (Y + _TextHeightArial11),
_EndDate);
// Draw the 'Processing...' text if the view flagged that it's processing
await DrawProcessingAsync(CanvasWidth, CanvasHeight);
}
if (_context == null) { return; }
// Returned as long but it impacts the DayCellWidth calculation if left as a long
double CanvasHeight = _canvasReference.Height;
double CanvasWidth = _canvasReference.Width;
// Give a bit of space before the top of the timeline for the month abbreviation(s)
double TimelineTop = (_TextHeightArial11 + 5);
// Day (cell) calculations (Date Range is 30 days before today's date which is 31 days in
// total so add 1 to the days)
double DayCellWidth = ((CanvasWidth - TIMELINE_BORDER_WIDTH) /
(DATE_RANGE_DAYS + 1));
double HalfDayCellWidth = (DayCellWidth / 2);
double DayTop = (TimelineTop + DAY_QUARTER_HEIGHT);
// Clear the previous drawing. Need to start at -0.5 because of the call to TranslateAsync
// in the OnAfterRenderAsync method to straddle the pixels so that a 1 pixel line is actually
// 1 pixel wide.
await _context.ClearRectAsync(-0.5, -0.5, CanvasWidth, CanvasHeight);
// Fill the timeline's background with the blue
await _context.SetFillStyleAsync(TIMELINE_BACKGROUND_COLOR);
await _context.FillRectAsync(0, TimelineTop, CanvasWidth, TIMELINE_HEIGHT);
// Draw the border
await _context.BeginPathAsync(); // Clears previous lines that were drawn
await _context.SetLineWidthAsync(TIMELINE_BORDER_WIDTH);
await _context.SetStrokeStyleAsync(TIMELINE_BORDER_COLOR);
await _context.StrokeRectAsync(1, TimelineTop,
(CanvasWidth - TIMELINE_BORDER_WIDTH - 1), TIMELINE_HEIGHT);
// Set the stroke to a width of 1 for the rest of the lines
await _context.SetLineWidthAsync(1);
int CurrentDayIndex = 0;
double MonthRightX = 0.0;
double X = 0.0;
double Y = 0.0;
DateTime LoopDate = _StartDate;
while (LoopDate <= _EndDate)
{
// Draw the current month's abbreviation above the timeline if this is the first time
// through the loop.
if (CurrentDayIndex == 0)
{
// If the current day is the first day of the month and this is not the first time through the
// loop...(if this is the first time through the loop, the month abbreviation was already
// drawn above)
if (LoopDate.Day == 1 && CurrentDayIndex > 0)
{
// If this is the last date of the loop...
if (LoopDate == _EndDate)
{
else // Haven't yet reached today's date...
{
// Draw the day of the month (e.g. 1, 2, ...30, 31) just below the top border
Y = (TimelineTop + TIMELINE_BORDER_WIDTH + _TextHeightArial9 + 2);
await DrawDayOfMonthAsync((X + HalfDayCellWidth), Y, LoopDate);
// If an employee is selected...
if (Employee != null)
{
// Increment the current index and date for the next loop
LoopDate = LoopDate.AddDays(1);
CurrentDayIndex++;
// Determine the X position for the next day's data
X = (CurrentDayIndex * DayCellWidth);
}
// through the loop.
if (CurrentDayIndex == 0)
{
MonthRightX = await DrawMonthAbbreviationAsync((X + 4), (TimelineTop - 5),
LoopDate);
}
LoopDate);
// If the current day is the first day of the month and this is not the first time through the
// loop...(if this is the first time through the loop, the month abbreviation was already
// drawn above)
if (LoopDate.Day == 1 && CurrentDayIndex > 0)
{
// Draw a vertical line separating the previous month from the new one
await _context.BeginPathAsync();
await _context.SetStrokeStyleAsync(TIMELINE_BORDER_COLOR);
await _context.MoveToAsync(X, TimelineTop);
await _context.LineToAsync(X, (TimelineTop + TIMELINE_HEIGHT));
await _context.StrokeAsync();
// Determine the X position of the text. If the position will overlap an existing
// abbreviation then adjust the X position to accommodate the previous abbreviation.
double MonthX = (X + 4);
if ((X + 4) <= (MonthRightX + 4)) { MonthX = (MonthRightX + 4); }
// Draw the current month's abbreviation
MonthRightX = await DrawMonthAbbreviationAsync(MonthX, (TimelineTop - 5),
LoopDate);
}
await _context.BeginPathAsync();
await _context.SetStrokeStyleAsync(TIMELINE_BORDER_COLOR);
await _context.MoveToAsync(X, TimelineTop);
await _context.LineToAsync(X, (TimelineTop + TIMELINE_HEIGHT));
await _context.StrokeAsync();
// Determine the X position of the text. If the position will overlap an existing
// abbreviation then adjust the X position to accommodate the previous abbreviation.
double MonthX = (X + 4);
if ((X + 4) <= (MonthRightX + 4)) { MonthX = (MonthRightX + 4); }
// Draw the current month's abbreviation
MonthRightX = await DrawMonthAbbreviationAsync(MonthX, (TimelineTop - 5),
LoopDate);
// If this is the last date of the loop...
if (LoopDate == _EndDate)
{
// Draw the background differently to signal this is the current date
await _context.SetStrokeStyleAsync(TIMELINE_BORDER_COLOR);
await _context.SetFillStyleAsync(TODAY_BACKGROUND_COLOR);
await _context.FillRectAsync(X, TimelineTop, DayCellWidth, TIMELINE_HEIGHT);
await _context.StrokeRectAsync(X, TimelineTop, DayCellWidth, TIMELINE_HEIGHT);
}
await _context.SetStrokeStyleAsync(TIMELINE_BORDER_COLOR);
await _context.SetFillStyleAsync(TODAY_BACKGROUND_COLOR);
await _context.FillRectAsync(X, TimelineTop, DayCellWidth, TIMELINE_HEIGHT);
await _context.StrokeRectAsync(X, TimelineTop, DayCellWidth, TIMELINE_HEIGHT);
else // Haven't yet reached today's date...
{
// If this is a non-working day, draw the background for a non-working day
await DrawNonWorkingDayBackgroundAsync(X, TimelineTop, DayCellWidth,
TIMELINE_HEIGHT, LoopDate, Employee);
}
await DrawNonWorkingDayBackgroundAsync(X, TimelineTop, DayCellWidth,
TIMELINE_HEIGHT, LoopDate, Employee);
// Draw the day of the month (e.g. 1, 2, ...30, 31) just below the top border
Y = (TimelineTop + TIMELINE_BORDER_WIDTH + _TextHeightArial9 + 2);
await DrawDayOfMonthAsync((X + HalfDayCellWidth), Y, LoopDate);
// If an employee is selected...
if (Employee != null)
{
// Draw the Status indicators (indicates if there are Rejected, Unsubmitted, Under
// Review, or Approved time entries for the current date)
await DrawStatusesAsync(X, DayTop, DayCellWidth, LoopDate);
}
// Review, or Approved time entries for the current date)
await DrawStatusesAsync(X, DayTop, DayCellWidth, LoopDate);
// Increment the current index and date for the next loop
LoopDate = LoopDate.AddDays(1);
CurrentDayIndex++;
// Determine the X position for the next day's data
X = (CurrentDayIndex * DayCellWidth);
// Draw the legend under the timeline (+ 2 so there's a bit of padding between the bottom
// of the timeline and top of the triangles)
Y = (TimelineTop + TIMELINE_HEIGHT + 2);
await DrawLegendAsync(4, Y);
// Draw Today's date (e.g. 'Today (July 15, 2020)') below the timeline
await DrawTodayStringAsync((X - TIMELINE_BORDER_WIDTH), (Y + _TextHeightArial11),
_EndDate);
// Draw the 'Processing...' text if the view flagged that it's processing
await DrawProcessingAsync(CanvasWidth, CanvasHeight);
The next method to define is the GetTextHeightAsync method.
The GetTextHeightAsync method
At the moment, the canvas method MeasureTextAsync only returns a Width value with the rest of the properties set to zero. As a result, the GetTextHeightAsync method has been created to return the approximate height of the text based on the font information specified. Measuring the width of an M character returns a width that is close to the height of the text.
Add the code in the following snippet to the end of your Index.razor file before the @code's closing curly brace:
protected async Task<double> GetTextHeightAsync(string FontInfo)
{
{
await _context.SetFontAsync(FontInfo);
TextMetrics Metrics = await _context.MeasureTextAsync("M");
return Metrics.Width;
}
TextMetrics Metrics = await _context.MeasureTextAsync("M");
return Metrics.Width;
The next method to define is the DrawNonWorkingDayBackgroundAsync method.
The DrawNonWorkingDayBackgroundAsync method
The DrawNonWorkingDayBackgroundAsync method draws a slightly darker background on days that are non-working days for the selected employee. If there isn't an employee selected, the default non-working days are Saturday and Sunday.
Add the code in the following snippet, before the @code's closing curly brace, at the end of your Index.razor file:
protected async Task DrawNonWorkingDayBackgroundAsync(double X, double Y,
double Width, double Height, DateTime LoopDate, Employee Employee)
{
double Width, double Height, DateTime LoopDate, Employee Employee)
{
bool IsNonWorkingDay = false;
// If no employee is selected...
if (Employee == null)
{
else // There is an employee selected...
{
// If this is a non-working day...
if (IsNonWorkingDay)
{
}
// If no employee is selected...
if (Employee == null)
{
// Saturday and Sunday are the default non-working days
IsNonWorkingDay = (LoopDate.DayOfWeek == DayOfWeek.Saturday ||
LoopDate.DayOfWeek == DayOfWeek.Sunday);
}
IsNonWorkingDay = (LoopDate.DayOfWeek == DayOfWeek.Saturday ||
LoopDate.DayOfWeek == DayOfWeek.Sunday);
else // There is an employee selected...
{
// Check to see if this day is a non-working day for the selected employee
IsNonWorkingDay = !Employee.IsWorkingDay(LoopDate.DayOfWeek);
}
IsNonWorkingDay = !Employee.IsWorkingDay(LoopDate.DayOfWeek);
// If this is a non-working day...
if (IsNonWorkingDay)
{
await _context.SetFillStyleAsync(NON_WORKING_DAY_BACKGROUND_COLOR);
await _context.FillRectAsync(X, Y, Width, Height);
}
await _context.FillRectAsync(X, Y, Width, Height);
The next methods to define are the DrawMonthAbbreviationAsync, DrawDayOfMonthAsync, DrawTodayStringAsync and methods.
The date text drawing methods
The first method is the DrawMonthAbbreviationAsync method that draws the month's abbreviation (Sep for September for example) at the location specified. The method also returns the right edge of the text that was drawn so that the timeline doesn't draw over the previous abbreviation if the month changes early on the timeline.
The second method is the DrawDayOfMonthAsync method that draws the date's day of the month value (28, 29, 30 for example) along the top of the timeline.
The third method is the DrawTodayStringAsync method that draws the current date under the timeline at the right edge of the canvas to indicate the last date displayed on the timeline.
Add the code in the following snippet, before the @code's closing curly brace, at the end of your Index.razor file:
protected async Task<double> DrawMonthAbbreviationAsync(double X, double Y,
DateTime LoopDate)
{
protected async Task DrawDayOfMonthAsync(double X, double Y, DateTime LoopDate)
{
protected async Task DrawTodayStringAsync(double X, double Y, DateTime Today)
{
DateTime LoopDate)
{
string Text = LoopDate.ToString("MMM");
double Width = await DrawTextAsync(X, Y, Text, FONTINFO_ARIAL_11);
return (X + Width);
}
double Width = await DrawTextAsync(X, Y, Text, FONTINFO_ARIAL_11);
return (X + Width);
protected async Task DrawDayOfMonthAsync(double X, double Y, DateTime LoopDate)
{
// Text is horizontally centered in the day's column
string Text = LoopDate.Day.ToString(); // The numeric day value (e.g. 1, 2, ... 30, 31)
await DrawTextAsync(X, Y, Text, FONTINFO_ARIAL_9, TEXT_COLOR, TextAlign.Center);
}
string Text = LoopDate.Day.ToString(); // The numeric day value (e.g. 1, 2, ... 30, 31)
await DrawTextAsync(X, Y, Text, FONTINFO_ARIAL_9, TEXT_COLOR, TextAlign.Center);
protected async Task DrawTodayStringAsync(double X, double Y, DateTime Today)
{
// Text is right aligned on the X
string Text = Today.ToString("'Today ('MMMM d, yyyy')'");
await DrawTextAsync(X, Y, Text, FONTINFO_ARIAL_11, TEXT_COLOR, TextAlign.Right,
TextBaseline.Middle);
}
string Text = Today.ToString("'Today ('MMMM d, yyyy')'");
await DrawTextAsync(X, Y, Text, FONTINFO_ARIAL_11, TEXT_COLOR, TextAlign.Right,
TextBaseline.Middle);
The next method to define is the DrawStatusesAsync method.
The DrawStatusesAsync method
The DrawStatusesAsync method first loops through the selected employee's time to see if there's time at the current date on the timeline and if the time's status is rejected, unsubmitted, under review, or approved. If a time entry was found for each status, the loop will exit.
Following the loop, if time was found for a status, the DrawTriangleAsync method is called to draw a triangle indicating the status.
Add the code in the following snippet to the end of your Index.razor file before the @code's closing curly brace:
protected async Task DrawStatusesAsync(double X, double Y, double DayCellWidth,
DateTime LoopDate)
{
DateTime LoopDate)
{
bool DayHasRejectedTime = false;
bool DayHasUnsubmittedTime = false;
bool DayHasUnderReviewTime = false;
bool DayHasApprovedTime = false;
string Status = ""
foreach (TimeEntry Time in _TimeEntries)
{
int Quarter = 0;
if (DayHasUnsubmittedTime)
{
if (DayHasRejectedTime)
{
if (DayHasUnderReviewTime)
{
if (DayHasApprovedTime)
{
}
bool DayHasUnsubmittedTime = false;
bool DayHasUnderReviewTime = false;
bool DayHasApprovedTime = false;
string Status = ""
foreach (TimeEntry Time in _TimeEntries)
{
// Exit the loop if it has passed the date needed
if (Time.TheDate > LoopDate) { break; }
// If the current item matches the date needed then...
if (Time.TheDate == LoopDate)
{
}
if (Time.TheDate > LoopDate) { break; }
// If the current item matches the date needed then...
if (Time.TheDate == LoopDate)
{
Status = Time.Sheet.Status;
if (Status == "R") { DayHasRejectedTime = true; }
else if (Status == "N") { DayHasUnsubmittedTime = true; }
else if (Status == "U") { DayHasUnderReviewTime = true; }
else if (Status == "A") { DayHasApprovedTime = true; }
// If all four statuses have been found, exit the loop
if (DayHasRejectedTime && DayHasUnsubmittedTime && DayHasUnderReviewTime
&& DayHasApprovedTime) { break; }
}
if (Status == "R") { DayHasRejectedTime = true; }
else if (Status == "N") { DayHasUnsubmittedTime = true; }
else if (Status == "U") { DayHasUnderReviewTime = true; }
else if (Status == "A") { DayHasApprovedTime = true; }
// If all four statuses have been found, exit the loop
if (DayHasRejectedTime && DayHasUnsubmittedTime && DayHasUnderReviewTime
&& DayHasApprovedTime) { break; }
int Quarter = 0;
if (DayHasUnsubmittedTime)
{
await DrawTriangleAsync(X, (Y + (Quarter * DAY_QUARTER_HEIGHT)), DayCellWidth,
STATUS_COLOR_UNSUBMITTED_FILL, STATUS_COLOR_UNSUBMITTED_BORDER);
}
STATUS_COLOR_UNSUBMITTED_FILL, STATUS_COLOR_UNSUBMITTED_BORDER);
if (DayHasRejectedTime)
{
Quarter = 1;
await DrawTriangleAsync(X, (Y + (Quarter * DAY_QUARTER_HEIGHT)), DayCellWidth,
STATUS_COLOR_REJECTED_FILL, STATUS_COLOR_REJECTED_BORDER);
}
await DrawTriangleAsync(X, (Y + (Quarter * DAY_QUARTER_HEIGHT)), DayCellWidth,
STATUS_COLOR_REJECTED_FILL, STATUS_COLOR_REJECTED_BORDER);
if (DayHasUnderReviewTime)
{
Quarter = 2;
await DrawTriangleAsync(X, (Y + (Quarter * DAY_QUARTER_HEIGHT)), DayCellWidth,
STATUS_COLOR_UNDER_REVIEW_FILL,
STATUS_COLOR_UNDER_REVIEW_BORDER);
}
await DrawTriangleAsync(X, (Y + (Quarter * DAY_QUARTER_HEIGHT)), DayCellWidth,
STATUS_COLOR_UNDER_REVIEW_FILL,
STATUS_COLOR_UNDER_REVIEW_BORDER);
if (DayHasApprovedTime)
{
Quarter = 3;
await DrawTriangleAsync(X, (Y + (Quarter * DAY_QUARTER_HEIGHT)), DayCellWidth,
STATUS_COLOR_APPROVED_FILL, STATUS_COLOR_APPROVED_BORDER);
}
await DrawTriangleAsync(X, (Y + (Quarter * DAY_QUARTER_HEIGHT)), DayCellWidth,
STATUS_COLOR_APPROVED_FILL, STATUS_COLOR_APPROVED_BORDER);
The next method to define is the DrawTriangleAsync method.
The DrawTriangleAsync method
The DrawTriangleAsync method draws a triangle at the specified location using the colors provided.
Add the code in the following snippet to the end of your Index.razor file but before the @code's closing curly brace:
protected async Task DrawTriangleAsync(double X, double Y, double DayCellWidth,
string FillColor, string BorderColor)
{
string FillColor, string BorderColor)
{
// The triangle is 10 pixels wide and 14 pixels tall
double XStart = (X + ((DayCellWidth - 10) / 2));
double YStart = (Y + ((DAY_QUARTER_HEIGHT - 14) / 2));
// Set the line and fill colors
await _context.SetFillStyleAsync(FillColor);
await _context.SetStrokeStyleAsync(BorderColor);
// Plot the triangle's outline
await _context.BeginPathAsync();
await _context.MoveToAsync(XStart, YStart);
await _context.LineToAsync((XStart + 3), YStart);
await _context.LineToAsync((XStart + 9), (YStart + 6));
await _context.LineToAsync((XStart + 9), (YStart + 7));
await _context.LineToAsync((XStart + 3), (YStart + 13));
await _context.LineToAsync(XStart, (YStart + 13));
await _context.LineToAsync(XStart, YStart);
// Fill the triangle and then draw the outline
await _context.FillAsync();
await _context.StrokeAsync();
}
double XStart = (X + ((DayCellWidth - 10) / 2));
double YStart = (Y + ((DAY_QUARTER_HEIGHT - 14) / 2));
// Set the line and fill colors
await _context.SetFillStyleAsync(FillColor);
await _context.SetStrokeStyleAsync(BorderColor);
// Plot the triangle's outline
await _context.BeginPathAsync();
await _context.MoveToAsync(XStart, YStart);
await _context.LineToAsync((XStart + 3), YStart);
await _context.LineToAsync((XStart + 9), (YStart + 6));
await _context.LineToAsync((XStart + 9), (YStart + 7));
await _context.LineToAsync((XStart + 3), (YStart + 13));
await _context.LineToAsync(XStart, (YStart + 13));
await _context.LineToAsync(XStart, YStart);
// Fill the triangle and then draw the outline
await _context.FillAsync();
await _context.StrokeAsync();
The next method to define is the DrawLegendAsync method.
The DrawLegendAsync method
The DrawLegendAsync method draws a legend under the timeline, starting at the left edge of the canvas, to indicate which time entry status each triangle color represents.
Add the code in the following snippet before the @code's closing curly brace at the end of your Index.razor file:
protected async Task DrawLegendAsync(double X, double Y)
{
{
double TextY = (Y + _TextHeightArial11);
// Unsubmitted
await DrawTriangleAsync(X, Y, 10, STATUS_COLOR_UNSUBMITTED_FILL,
STATUS_COLOR_UNSUBMITTED_BORDER);
double TextWidth = await DrawTextAsync((X + 12), TextY, "Unsubmitted",
FONTINFO_ARIAL_11, Baseline: TextBaseline.Middle);
// Rejected
X += (12 + TextWidth + 8);
await DrawTriangleAsync(X, Y, 10, STATUS_COLOR_REJECTED_FILL,
STATUS_COLOR_REJECTED_BORDER);
TextWidth = await DrawTextAsync((X + 12), TextY, "Rejected", FONTINFO_ARIAL_11,
Baseline: TextBaseline.Middle);
// Under Review
X += (12 + TextWidth + 8);
await DrawTriangleAsync(X, Y, 10, STATUS_COLOR_UNDER_REVIEW_FILL,
STATUS_COLOR_UNDER_REVIEW_BORDER);
TextWidth = await DrawTextAsync((X + 12), TextY, "Under Review", FONTINFO_ARIAL_11,
Baseline: TextBaseline.Middle);
// Approved
X += (12 + TextWidth + 8);
await DrawTriangleAsync(X, Y, 10, STATUS_COLOR_APPROVED_FILL,
STATUS_COLOR_APPROVED_BORDER);
await DrawTextAsync((X + 12), TextY, "Approved", FONTINFO_ARIAL_11,
Baseline: TextBaseline.Middle);
}
// Unsubmitted
await DrawTriangleAsync(X, Y, 10, STATUS_COLOR_UNSUBMITTED_FILL,
STATUS_COLOR_UNSUBMITTED_BORDER);
double TextWidth = await DrawTextAsync((X + 12), TextY, "Unsubmitted",
FONTINFO_ARIAL_11, Baseline: TextBaseline.Middle);
// Rejected
X += (12 + TextWidth + 8);
await DrawTriangleAsync(X, Y, 10, STATUS_COLOR_REJECTED_FILL,
STATUS_COLOR_REJECTED_BORDER);
TextWidth = await DrawTextAsync((X + 12), TextY, "Rejected", FONTINFO_ARIAL_11,
Baseline: TextBaseline.Middle);
// Under Review
X += (12 + TextWidth + 8);
await DrawTriangleAsync(X, Y, 10, STATUS_COLOR_UNDER_REVIEW_FILL,
STATUS_COLOR_UNDER_REVIEW_BORDER);
TextWidth = await DrawTextAsync((X + 12), TextY, "Under Review", FONTINFO_ARIAL_11,
Baseline: TextBaseline.Middle);
// Approved
X += (12 + TextWidth + 8);
await DrawTriangleAsync(X, Y, 10, STATUS_COLOR_APPROVED_FILL,
STATUS_COLOR_APPROVED_BORDER);
await DrawTextAsync((X + 12), TextY, "Approved", FONTINFO_ARIAL_11,
Baseline: TextBaseline.Middle);
The next method you need to define is the DrawProcessingAsync method.
The DrawProcessingAsync method
If the view indicates that there's processing occurring, the DrawProcessingAsync method draws an opaque layer over the canvas and then draws the text "Processing... One moment please." horizontally and vertically centered on the canvas.
Add the code in the following snippet before the @code's closing curly brace at the end of your Index.razor file:
protected async Task DrawProcessingAsync(double Width, double Height)
{
{
// If the view is processing then...
if (_IndicateProcessing)
{
}
if (_IndicateProcessing)
{
// Draw an opaque background over the timeline
await _context.SetFillStyleAsync(PROCESSING_TEXT_BACKGROUND_COLOR);
await _context.FillRectAsync(0, 0, Width, Height);
// Text is horizontally and vertically centered in the space given
await DrawTextAsync((Width / 2), ((Height - _TextHeightArial26Bold) / 2),
"Processing... One moment please.", FONTINFO_ARIAL_26_BOLD,
PROCESSING_TEXT_COLOR, TextAlign.Center, TextBaseline.Top);
}
await _context.SetFillStyleAsync(PROCESSING_TEXT_BACKGROUND_COLOR);
await _context.FillRectAsync(0, 0, Width, Height);
// Text is horizontally and vertically centered in the space given
await DrawTextAsync((Width / 2), ((Height - _TextHeightArial26Bold) / 2),
"Processing... One moment please.", FONTINFO_ARIAL_26_BOLD,
PROCESSING_TEXT_COLOR, TextAlign.Center, TextBaseline.Top);
The final method to define is the DrawTextAsync method.
The DrawTextAsync method
The DrawTextAsync method draws the text at the location specified and accepts several optional parameters for controlling the text color and alignment. The method also returns the width of the text that was drawn in the event the calling method needs that information.
Add the code in the following snippet before the @code's closing curly brace at the end of your Index.razor file:
protected async Task<double> DrawTextAsync(double X, double Y, string Text,
string FontInfo = FONTINFO_ARIAL_9, string TextColor = TEXT_COLOR,
TextAlign Align = TextAlign.Left, TextBaseline Baseline = TextBaseline.Alphabetic)
{
string FontInfo = FONTINFO_ARIAL_9, string TextColor = TEXT_COLOR,
TextAlign Align = TextAlign.Left, TextBaseline Baseline = TextBaseline.Alphabetic)
{
await _context.SetFontAsync(FontInfo);
TextMetrics Metrics = await _context.MeasureTextAsync(Text);
await _context.SetFillStyleAsync(TextColor);
await _context.SetTextAlignAsync(Align);
await _context.SetTextBaselineAsync(Baseline);
await _context.FillTextAsync(Text, X, Y);
return Metrics.Width;
}
TextMetrics Metrics = await _context.MeasureTextAsync(Text);
await _context.SetFillStyleAsync(TextColor);
await _context.SetTextAlignAsync(Align);
await _context.SetTextBaselineAsync(Baseline);
await _context.FillTextAsync(Text, X, Y);
return Metrics.Width;
That's it for the Time Entry Status view itself.
The next section is optional and will walk you through adjusting a few things with the Blazor application to customize it. If you wish to skip the customizations, you can jump ahead to the Viewing the results section.
Customizing the application
When you create a Blazor WebAssembly application, the template adds three views to show you some of what's possible. You just reworked the Home (Index) view but the other two views, Counter and Fetch data, aren't needed.
The following are the steps to remove the Counter and Fetch data views:
- In the Solution Explorer
- Expand the Pages folder and delete the following files:
- Counter.razor
- FetchData.razor
- Expand the wwwroot folder
- Delete the weather.json file that's in the sample-data folder
- Delete the sample-data folder
- Expand the Shared folder and open the NavMenu.razor file
- At the top of the page, there's an a tag. Change the text from BlazorTimeEntryStatus to Blazor - Time Entry Status
- Delete the li tags for the Counter and Fetch data items shown in the following snippet:
<li class="nav-item px-3"><navlink class="nav-link" href="counter"></li><span aria-hidden="true" class="oi oi-plus"></span> Counter</navlink>
<li class="nav-item px-3"><navlink class="nav-link" href="fetchdata"></li><span aria-hidden="true" class="oi oi-list-rich"></span> Fetch data</navlink>
- Expand the Pages folder and delete the following files:
To remove the About bar at the top of the Time Entry Status view:
- In the Solution Explorer, expand the Shared folder
- Delete the SurveyPrompt.razor file
- Open the MainLayout.razor file and delete the following lines of markup that are within the <div class="main"> div:
<div class="top-row px-4"><a class="ml-md-auto" href="http://blazor.net" target="_blank">About</a></div>
With the customizations to the Blazor WebAssembly application complete, it's time to view the results.
Viewing the results
As shown in the following image, if you run the application, you'll see the Time Entry Status view with your C# code running in a browser via WebAssembly!
Clicking on an employee in the list should show you the statuses of any time that has been entered for that employee in the previous 30 days. Note that the list of employees and statuses will differ if you're connected to a different Dovico Timesheet database.
(click to view the image full size)
Before I end this article, I want to point out some security considerations that apply not only to Blazor WebAssembly applications but also web applications in general.
Security considerations
Because you're writing code with C#, it's easy to forget that the code isn't running on a server when you build a Blazor WebAssembly application. All of your code is downloaded and executed in the browser by the mono runtime. You shouldn't include anything in your codebase that you don't want others to see.
Also, even though you may use code like the HttpClient class, under the hood, Blazor is actually using the browser's Fetch API to make the HTTP calls. It's really easy to inspect HTTP requests from a web page. For example, the following screenshot is showing the network tab of the Chrome browser's developer tools when the employee, Nancy Johnson, is selected. As you can see in the bottom-right corner, the request headers are visible:
Summary
In this article you learned the following:
- A Blazor WebAssembly application allows C# code to run in the browser via the mono runtime which is compiled to WebAssembly.
- Blazor uses razor pages which are a combination of razor markup, HTML and C# code. All code in the razor file is included within an @code{} block.
- The @inject directive is used to inject a service into your page.
- The @ref attribute is used to give your C# code a reference to an HTML element.
- The HttpClient object's DefaultRequestHeaders object can be given header values that all subsequent HTTP requests will use.
- The Blazor.Extensions.Canvas nuget package allows your C# code to interact with an HTML Canvas element more naturally.
- Blazor has a number of life cycle methods including OnInitializedAsync and OnAfterRenderAsync. A canvas element is not available until the OnAfterRenderAsync method.
- You shouldn't include anything in your codebase that you don't want anyone outside your organization seeing. You also need to be careful not to include sensitive information in your HTTP requests because they can be easily inspected in the browser.
Source Code
The source code for this article can be found in the following github repository: https://github.com/cggallant/blog_post_code/tree/master/2020-October-BlazorTimeEntryStatus
The source code for this article can be found in the following github repository: https://github.com/cggallant/blog_post_code/tree/master/2020-October-BlazorTimeEntryStatus
Additional Material on WebAssembly
Like what you read and are interested in learning more about WebAssembly?
Like what you read and are interested in learning more about WebAssembly?
- Check out my book "WebAssembly in Action"
 The book introduces the WebAssembly stack and walks you through the process of writing and running browser-based applications. It also covers dynamic linking multiple modules at runtime, using web workers to prefetch a module, threading, using WebAssembly modules in Node.js, working with the WebAssembly text format, debugging, and more.
The first chapter is free to read and, if you'd like to buy the book, it's 40% off with the following code: ggallantbl
- Using WebAssembly modules in C#
 While there were a lot of exciting things being worked on with the WebAssembly System Interface (WASI) at the time of my book's writing, unfortunately, it wasn't until after the book went to production that an early preview of the Wasmtime runtime was announced for .NET Core.
I wrote this article to show you how your C# code can load and use a WebAssembly module via the Wasmtime runtime for .NET. The article also covers how to create custom model validation with ASP.NET Core MVC.
- WebAssembly threads in Firefox
 My book shows you how to use WebAssembly threads but, at the time of its writing, they were only available in Firefox behind a flag. They're no longer behind a flag but Firefox has added a requirement: To enable the SharedArrayBuffer, you need to include two response headers.
Although the headers are only required by Firefox desktop at the time of this article's writing, this will soon change as Chrome for Android will require the headers when version 88 is released in January 2021. Chrome desktop is expected to require the headers by March 2021.
This article walks you through returning the response headers and using WebAssembly threads to convert a user-supplied image to greyscale.
- Using the import statement with an Emscripten-generated WebAssembly module in Vue.js
 Over the 2019 Christmas break, I helped a developer find a way to import an Emscripten-generated WebAssembly module into Vue.js. This article details the solutions found.
Disclaimer: I was not paid to write this article but but I do work for Dovico Software. I also receive royalties on the sale of the book "WebAssembly in Action".
No comments:
Post a Comment